|
1 members (MK3),
246
guests, and
79
robots. |
|
Key:
Admin,
Global Mod,
Mod
|
|
|
Forums39
Topics49,847
Posts837,389
Members9,596
| |
Most Online1,063
Jun 14th, 2026
|
|
|
|
Joined: Aug 2017
Posts: 504 Likes: 2
Talk Morgan Regular
|
OP

Talk Morgan Regular
Joined: Aug 2017
Posts: 504 Likes: 2 |
Got a persisting radiator leak (just a few drops each day), Thightened jubilee clips and tried with radiator cement, but with no sucsess. Been told that the radiator is a weak point on a Roadster S1, so I guess I will have to change it for a Mulberry. But how to get the old one out/new one in? From the top? Cowl off? From the bottom? Steering off?
There is a plastic plate underneath the radiator, that prevents both the access and inspection. The front end of this seems to be fixed with rivets. How on earth does one remove this?
Any hint will be appreciated.
Robbie the Norseman
2004 V6 Roadster
Sherwood green
|
|
|
|
|
Joined: May 2012
Posts: 1,519 Likes: 60
Talk Morgan Enthusiast
|
|
Talk Morgan Enthusiast
Joined: May 2012
Posts: 1,519 Likes: 60 |
Robbie,
Its a straightforward job - your roadster is probably very similar to the 4/4.
Jack up and support front on axle stands to give you room beneath rad.
Remove the chrome grill assembly from beneath and held in place by just four bolts. It accommodates the twin horns which need disconnecting. Withdraw it downwards. Remove the coolant hoses. The cradle which supports the old rad is unbolted.
Your new Mulfab or Mulberry (same difference) comes complete with twin support brackets that support the lower corners, and a long top bar brace* and bracket which bolts through from beneath the wings and attaches to the top of the alloy rad.
Juggle the rad about so its sits stress free and tighten fixings gradually by alternating one side to the other.
The top bar brace* has inner bolts and outer bolts that clamp onto the wings. Ensure that the inner pair are spaced to match the distance between the wings so that tightening does not draw the wings together.
Last edited by Moggo; 08/06/18 08:34 AM.
|
|
|
|
|
Joined: Feb 2010
Posts: 1,415
Has a lot to Say!
|
|
Has a lot to Say!
Joined: Feb 2010
Posts: 1,415 |
Robbie,
Its a straightforward job - your roadster is probably very similar to the 4/4.
Jack up and support front on axle stands to give you room beneath rad.
Remove the chrome grill assembly from beneath and held in place by just four bolts. It accommodates the twin horns which need disconnecting. Withdraw it downwards. Remove the coolant hoses. The cradle which supports the old rad is unbolted.
Your new Mulfab or Mulberry (same difference) comes complete with twin support brackets that support the lower corners, and a long top bar brace* and bracket which bolts through from beneath the wings and attaches to the top of the alloy rad.
Juggle the rad about so its sits stress free and tighten fixings gradually by alternating one side to the other.
The top bar brace* has inner bolts and outer bolts that clamp onto the wings. Ensure that the inner pair are spaced to match the distance between the wings so that tightening does not draw the wings together.
That's almost entirely wrong... The S1 Roadster radiator is virtually identical to the preceding + 8 Radiator, and is not the plastic tanked later version. The radiator is removed from below. The cowl and the cowl box do not need to be removed, although if your car has a riveted plastic under tray, then this needs the rivets drilling out and the tray discarding as the new radiator is longer Jack up and support the front of the car. Drain the coolant, some but not all the radiators have a drain tap in the bottom, disconnect the top and bottom coolant hoses from the radiator, fan wiring etc To gain a little extra space to help removal, undo the centre track rod bushes from the steering rack and swing the track rods out of the way. Undo the top and bottom radiator bobbins (3 points) and then loosen the radiator mounts where they are bolted to the front crossframe The mounts can then be swung aside slightly and then the radiator will "wiggle" out from underneath Fitting the new radiator is the reverse of the above, although the points made about allowing the radiator to sit unstressed are very valid. It is often worth drilling the top holes on the mounting brackets where they bolt to the crossframe slightly oversize (circa 9mm) to allow a bit of adjustment You will also note that there is no longer a filler neck on the radiator, the entire cooling system is filled from the bulkhead mounted header tank Don't be tempted to mix coolant types when refilling the coolant system. The various types of long life coolant are incompatible with each other and can gel or crystallise if mixed. I have aluminium radiators to suit the S1 Roadster on the shelf. SiFab radiators come complete with new mounting bobbins, new stainless steel hose clips and any other parts necessary to fit. There are also made from a stronger aluminium alloy than the Mulfab radiators, and come with a 2 year no quibble full replacement warranty 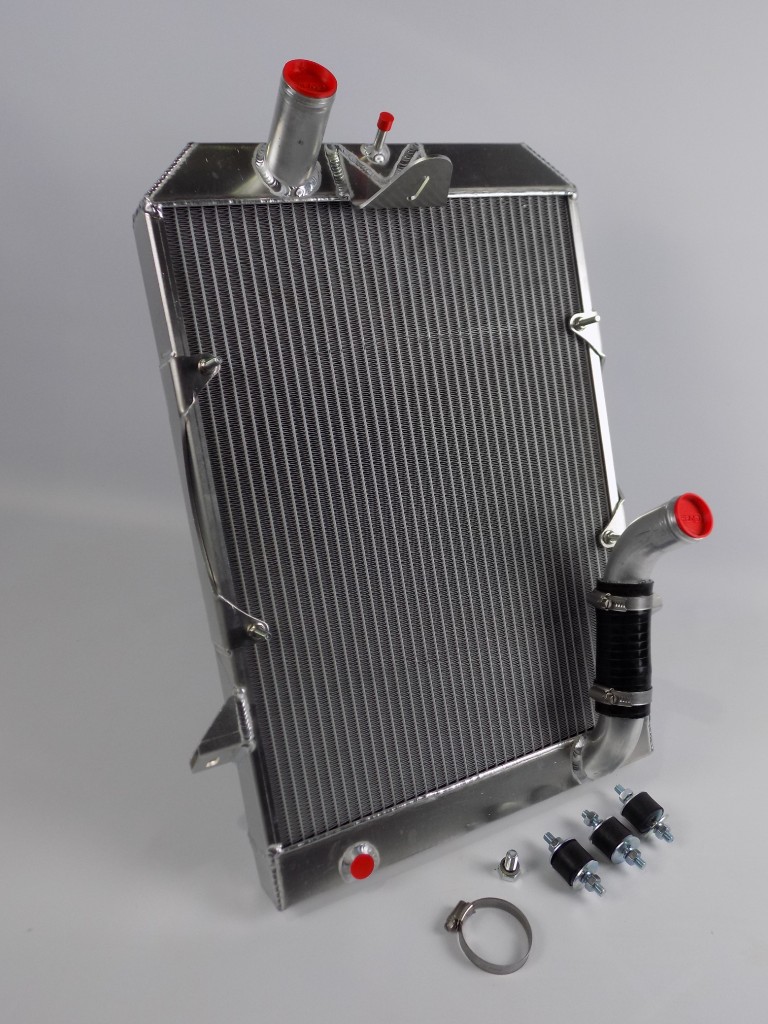 Simon @ SiFab.co.uk
Simon @ Sifab.co.uk
Sifabtemporary@gmail.com
|
|
|
|
|
Joined: Aug 2017
Posts: 504 Likes: 2
Talk Morgan Regular
|
|
OP
Talk Morgan Regular
Joined: Aug 2017
Posts: 504 Likes: 2 |
Ah, interesting, and I suspected that was the procedure including discarding the plastic undertray. Simon, I take it the old fan can be used? And would I need a valance, type Wolf Performance? And as your website is not working at the moment, what is the price, ex. VAT as I live outside the EU? If you prefer to PM me, my number is +47 90 85 11 39. Your choice.
Regards from Norway,
Robbie
Robbie the Norseman
2004 V6 Roadster
Sherwood green
|
|
|
|
|
Joined: Feb 2010
Posts: 1,415
Has a lot to Say!
|
|
Has a lot to Say!
Joined: Feb 2010
Posts: 1,415 |
I wouldn't necessarily recommend a Wolf Valance, they are nicely made, and look great, but are pretty much cosmetic, and don't do anything with regards to airflow through the radiator
The original fan is very good and can be reused
I've PM'd you some prices through the TalkMorgan message system
Simon @ SiFab.co.uk
Last edited by SimonH; 08/06/18 10:40 AM.
Simon @ Sifab.co.uk
Sifabtemporary@gmail.com
|
|
|
|
|
Joined: May 2012
Posts: 1,519 Likes: 60
Talk Morgan Enthusiast
|
|
Talk Morgan Enthusiast
Joined: May 2012
Posts: 1,519 Likes: 60 |
Three separate posts from my Blog show illustrations that might be of help - albeit on the 4/4.... Radiator post 1 Radiator post 2 Radiator post 3
|
|
|
|
|
Joined: Dec 2011
Posts: 486
Learner Plates Off!
|
|
Learner Plates Off!
Joined: Dec 2011
Posts: 486 |
I wouldn't necessarily recommend a Wolf Valance, they are nicely made, and look great, but are pretty much cosmetic, and don't do anything with regards to airflow through the radiator Simon I have to Clarify a few points here, but thank you for the complement of being nicely made: With regards to "Look great, but are pretty much cosmetic": This is not totally correct as they add stability to a Morgan both on Road and Race Morgans. "Don't do anything with regards to airflow through the radiator": The aperture allows air flow to the bottom part of the radiator. Especially as most of the Aftermarket Rads protrude below the cowl tray in a significant manor. More importantly after spending good money on a Aluminium RAD, surely it is a must to protect it from road debris, stones and road chips. This is possible as we have a very robust Bezeled stainless steel mesh across the aperture for this kind of protection of the Rad.
Cain
Wolf Cafe Racer
4/4 Sport
|
|
|
|
|
Joined: Nov 2015
Posts: 8,671 Likes: 489
Just barreling along Needs to Get Out More!
|
|
Just barreling along Needs to Get Out More!
Joined: Nov 2015
Posts: 8,671 Likes: 489 |
Robbie,
The S1 rads were the best as they have proper brass top and bottom tanks, not the horrible plastic ones on later models
My 2004 developed a tiny weep from the drain tap boss, which was professionally soldered for about £40 inc a pressure test and repaint
It was still perfect when I reluctantly sold the car at 50k miles earlier this year, so if you're handy with the spanners I personally would stick with the original
There are some advantages to the Alloy replacements, mainly for the plastic topped versions, but an S1 for road use is fine on the original rad
Jon M
|
|
|
|
|
Joined: Aug 2017
Posts: 504 Likes: 2
Talk Morgan Regular
|
|
OP
Talk Morgan Regular
Joined: Aug 2017
Posts: 504 Likes: 2 |
I can see Cain's point of view, but as a fact all the rad-changed cars that I know of does not have a protective valance - for what it is worth. Anyhow, my first task will be to see if my rad is provided with brass or plastic tanks. If plastic, it will be changed, if brass, I will have to see if there is a posibility of soldering before I order a new one. If I change rad, most likely a valance will be fitted in due time. Seems that I have a little research project coming up. So far, thanks to everybody that has been involved.
Robbie the Norseman
2004 V6 Roadster
Sherwood green
|
|
|
|
|
Joined: Jun 2014
Posts: 11,616 Likes: 43
Wave & smile... It's a Morgan Member of the Inner Circle
|
|
Wave & smile... It's a Morgan Member of the Inner Circle
Joined: Jun 2014
Posts: 11,616 Likes: 43 |
I don’t think it’s just a question of a valance protecting the new alloy rad, in my view it’s alao a question of aesthetics I hated the look of the alloy rad sticking down under my Roadster when I bought it It made the car look too high and the rad just looked numb I will go for a full bumper and one of Cain’s valances eventually (now I’m confident I can make a good job of spraying up a valance) possibly next year but as a temporary measure I lowered the front number plate Before I bought it and after 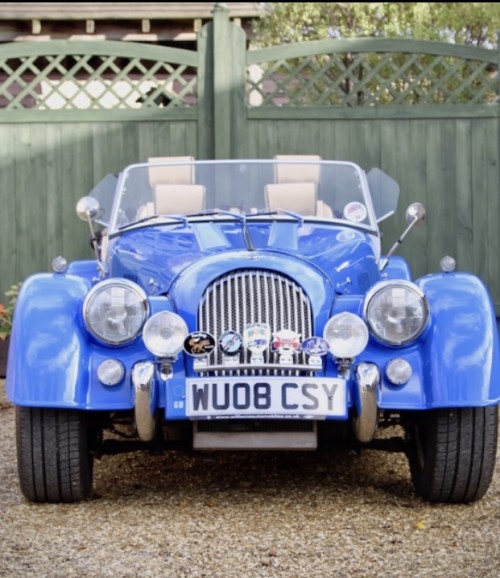 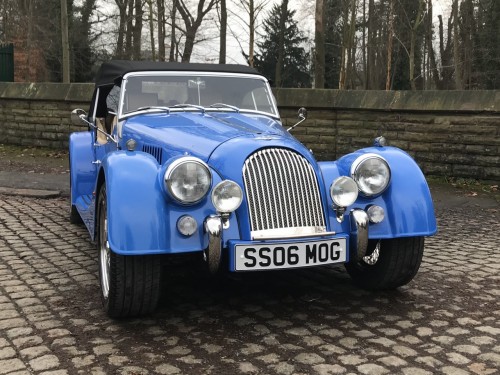
2008 XXVII Platform, Bugatti Blue Roadster 4 Seater
|
|
|
|
|