|
9 members (High Hamster, Alistair, hugo, Joe Speetjens, MartinB60, GrumpyPa, xc68anc, BLUE+4, Jens),
310
guests, and
41
robots. |
|
Key:
Admin,
Global Mod,
Mod
|
|
SORN
by OldSkrote - 31/07/25 02:07 PM
|
New
by Rex_tulips - 30/07/25 07:59 PM
|
|
|
|
|
|
|
|
|
|
|
|
|
Forums34
Topics48,367
Posts813,400
Members9,215
| |
Most Online1,046
Aug 24th, 2023
|
|
|
|
Joined: Oct 2009
Posts: 552
Talk Morgan Regular
|

Talk Morgan Regular
Joined: Oct 2009
Posts: 552 |
Dave, did you use a standard length rebound spring for the rebuild?
Last edited by sawman; 23/01/11 01:23 PM.
|
|
|
|
|
Joined: May 2009
Posts: 1,558 Likes: 5
Talk Morgan Enthusiast
|
|
Talk Morgan Enthusiast
Joined: May 2009
Posts: 1,558 Likes: 5 |
thanks for your comprehensive reply, I've looked back through the photos I took of my Sport on build and the grease on the newly assembled king pins looks far too dark for LM and I would suspect that Castrol CL is the grease in question. The other explanation of course is that MMC buy in bulk what ever is cheap or on offer - BOGOF!
|
|
|
|
|
Joined: Aug 2008
Posts: 2,515
Talk Morgan Expert
|
|
Talk Morgan Expert
Joined: Aug 2008
Posts: 2,515 |
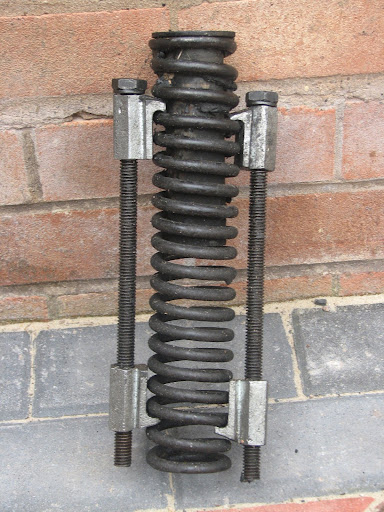 Great article. As an alternative to the motorcycle spring compressors I bought the skinniest pair of car spring compressors I could find on eBay then ground them down to fit the Morgan springs exactly. They did a great job.
1972 4/4 2 Seater
|
|
|
|
|
Joined: Oct 2010
Posts: 167
L - Learner Plates On
|
|
L - Learner Plates On
Joined: Oct 2010
Posts: 167 |
Dave
I have enjoyed watching this topic with interest, as I did exactly the same job on my �93 +8 last October.
I did not use any spring compressor at all. I wound down the bottom plate until the rebound spring was de-compressed using threaded rods like you used to reassemble, and then it was easy to remove the old main spring, and simple to install the new Mulberry one, by hand. Nothing scary about it.
Like you I fitted the top of the new pin into its socket before compressing up the spring again, as I reckoned it would be easier to line it all up with only very little compression in the main spring. The method advocated on the GoMog site didn't appeal to me as it would have meant trying to fit the top into its socket with the springs fully compressed.
As for bushing and reaming, I took both stub axles to Macdonald Racing near Durham, and they did the job for me in half an hour while I waited. Cheaper than a reamer, and less hard work!
Keep up the good work!
Fjemog
1993 Plus 8
|
|
|
|
|
Joined: Aug 2008
Posts: 2,515
Talk Morgan Expert
|
|
Talk Morgan Expert
Joined: Aug 2008
Posts: 2,515 |
I have enjoyed watching this topic with interest, as I did exactly the same job on my �93 +8 last October.
I did not use any spring compressor at all. I found that approach fine the first time I did the job when I had old springs on the car. When I put new ones on, the new mains were at least an inch longer than the old and very difficult to compress enough to fit. The new springs, incidentally, transformed the suspension which had previously had a habit of bottoming out.
1972 4/4 2 Seater
|
|
|
|
|
Joined: Dec 2008
Posts: 21,871 Likes: 168
Roadster Guru Member of the Inner Circle
|
|
OP
Roadster Guru Member of the Inner Circle
Joined: Dec 2008
Posts: 21,871 Likes: 168 |
Thanks all. I've used standard length rebound springs. I know there's a discussion on Mogtalk about this, and that it's apparently better if the rebound spring can be turned when the weight is on the suspension. I'm not convinced that a shorter sopring would make a noticeable difference, so for now it's standard length. I've made rapid progress today, and having done around six hours, the newly built stub is on the car, but I didn't get as far as the rebound spring. Interesting point about the main spring & compressors. What I found today was that if I removed the plastic spring protectors, the metal hooks have a much greater purchase. I also found that by mounting them low, the dust cover in the upper half of the spring doesn't get in the way. The new springs were just over half an inch too long to fit without the compressors, but it doesn't take much. I'm learning as I go along. The rebuilt stub simply slots into the bottom tube, then with the main spring compressed, slots into place. I really don't see why GoMog recommend leaving the top bolt until later on. Mine is already in place and only a couple of turns away from tight. I suppose that leaving the top bolt off does allow earlier location of the bottom kingpin nut, but that wasn't a problem on side 1. It's also recommended that you leave sufficient space to drop the kingpin out through the bottom, but this has not been necessary on mine. I also found time to tart up the caliper today. This is how it looks tonight - showing the level of compression required:  One or two other things. On the left is the new stainless lower damper stub fixing. On the right is the original. Look closely and you'll see that the bottom thread is coarser on the new part. The original part has AF threads at both ends. The new one has AF at the nyloc end, but the thread which locates into the stub axle I haven't been able to identify. Given that the nut section is Whitworth, I'm wondering if it's a Whitworth thread. And when did it change I wonder???  With the benefit of side 1, I made better use of the threaded rod on side 2.....  Wouldn't you think they would paint the stub axles????   Here's the reamer in action - I didn't take a photo of it on side 1 - too much concentration required!  Here it is painted and with the kingpin in place. I've cleaned out all the grease galleries & nipples as I've gone along.  Until tomorrow then........ 
DaveW
'05 Red Roadster S1
'16 Yellow (Not the only) Narrow AR GDI Plus 4
|
|
|
|
|
Joined: Apr 2010
Posts: 152
L - Learner Plates On
|
|
L - Learner Plates On
Joined: Apr 2010
Posts: 152 |
Dave,
perfect documented! I never have done this job, but anyway a question/idea:
It should be possible to release the tension of both springs without using compressors.
1. To loosen the both bolts of the bottom plate (not the central nut!)
2. To put a jack (in a secure way) under the lower central nut/bottom plate and lift slightly
3. Step by step loosening the upper kingpin bolt and at the same time lowering the jack till the tension is released.
Assembling in a reverse way.
Looks simple and reliable (no use of compressors and threaded rods), but there might be some obstacles, as I did not try this method.
Peter
|
|
|
|
|
Joined: Dec 2008
Posts: 21,871 Likes: 168
Roadster Guru Member of the Inner Circle
|
|
OP
Roadster Guru Member of the Inner Circle
Joined: Dec 2008
Posts: 21,871 Likes: 168 |
I think the jack idea is one way suggested on one of the Morgan sites, but I would be very wary of this method. As the rebound spring emerges from the lower plate, if it slips sideways it could be very hazardous.
If the main spring is at the standard length, you can't get it out without half an inch or so of compression. although an alternative method is to drop the kinpin through the bottom (this would keep the rebound spring under control) then pull the main spring out. That method requires thick gloves and some protection for the inside of the wing.
I would like to see how the factory fit these components, but have never managed to catch it being done.
DaveW
'05 Red Roadster S1
'16 Yellow (Not the only) Narrow AR GDI Plus 4
|
|
|
|
|
Joined: Dec 2008
Posts: 21,871 Likes: 168
Roadster Guru Member of the Inner Circle
|
|
OP
Roadster Guru Member of the Inner Circle
Joined: Dec 2008
Posts: 21,871 Likes: 168 |
I finished the main job today and all that's left now is the rebound gaiters - version two. Just to recap on the closing stages: Much happier doing this the second time. Instead of cable ties I used a screwdriver, just in case the rebound spring slipped.  Here it is half way up. Another reminder that the stub axle catches on the upper dust shield, so you must twiddle the stub to get it to telescope inside the cover. If the rebound spring compressses and there's no sign of the main spring compressing, that's what's happening, so take care.  And finally - the end product.......  One final note. About the nut dead centre in this photo. The stay bar is fastened with three bolts through the chassis.Two are vertical and not visible in this shot. Originally this one was fitted with the bolt head showing, and the nyloc nut inside. The shank of the bolt was pressed up against the wiring loom, which didn't make much sense, so I changed it round so the bolt head is inside. It probably wouldn't chafe if pressed against the loom, but you never know.  If this was the Scouts, I'd be sewing my kingpin badge on my shirt tonight. 
DaveW
'05 Red Roadster S1
'16 Yellow (Not the only) Narrow AR GDI Plus 4
|
|
|
|
|
Joined: May 2009
Posts: 2,190
South Wales Correspondent Talk Morgan Expert
|
|
South Wales Correspondent Talk Morgan Expert
Joined: May 2009
Posts: 2,190 |
Dave,
Nice job, great pics and I realylikes the screwdriver mod.
Are they EBC discs?
G
GLLHG
|
|
|
|
|


