|
10 members (MartinB60, Jon G4LJW, SCX358G, S2K03, xc68anc, Ruut Bianchi, TalkMorgan, +8Rich, teknome, James B W),
185
guests, and
42
robots. |
|
Key:
Admin,
Global Mod,
Mod
|
|
|
|
|
|
|
|
|
|
|
|
|
|
Glitch
by BobtheTrain - 18/07/25 05:47 PM
|
|
|
Forums34
Topics48,331
Posts812,876
Members9,203
| |
Most Online1,046
Aug 24th, 2023
|
|
|
|
Joined: Oct 2006
Posts: 2,403
Talk Morgan Expert
|
OP

Talk Morgan Expert
Joined: Oct 2006
Posts: 2,403 |
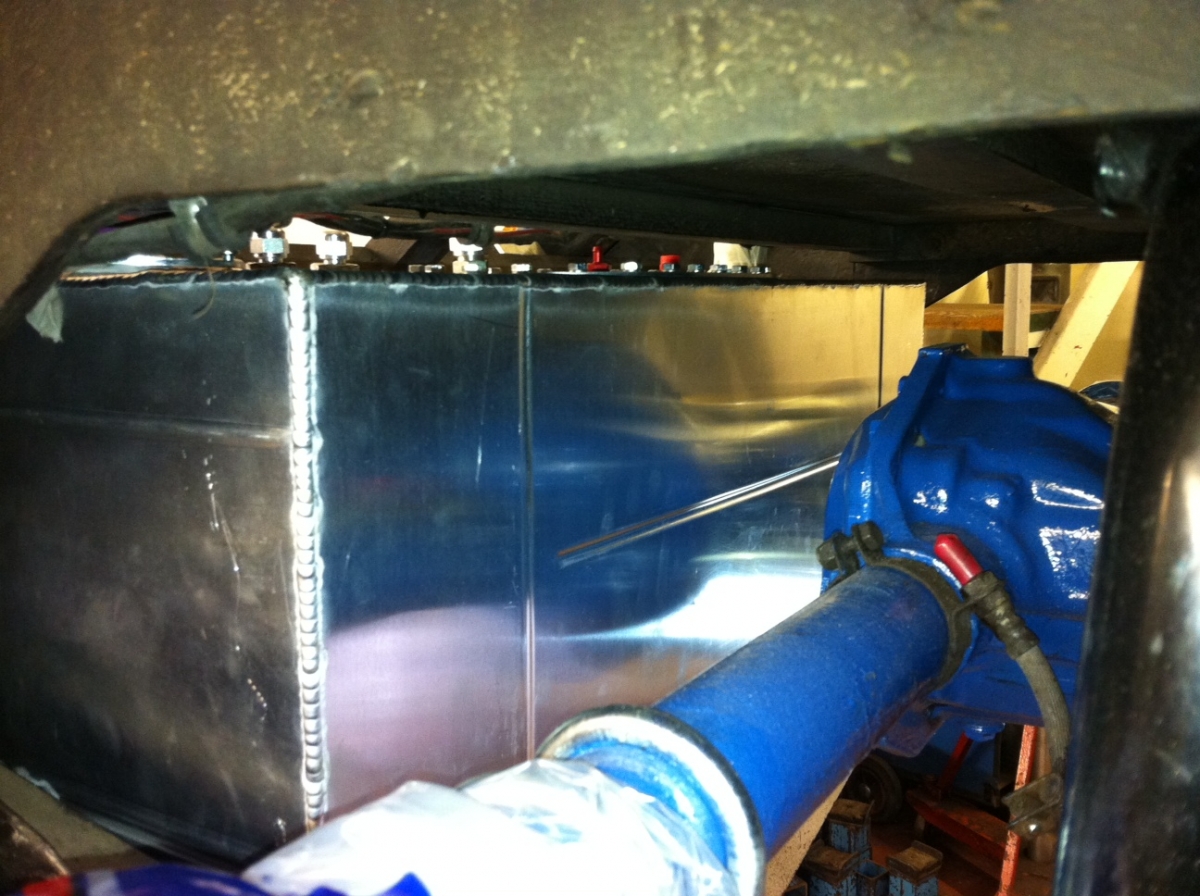 Following a first fit we dropped out the frame and tank, put wood preserver onto the wooden board and drilled the holes for the mounting frame, we also cut to small additional tabs to help provide some additional structural support to the front edge of the tank, the frame is quite thin here and we wanted a bit more meat in the bracket. 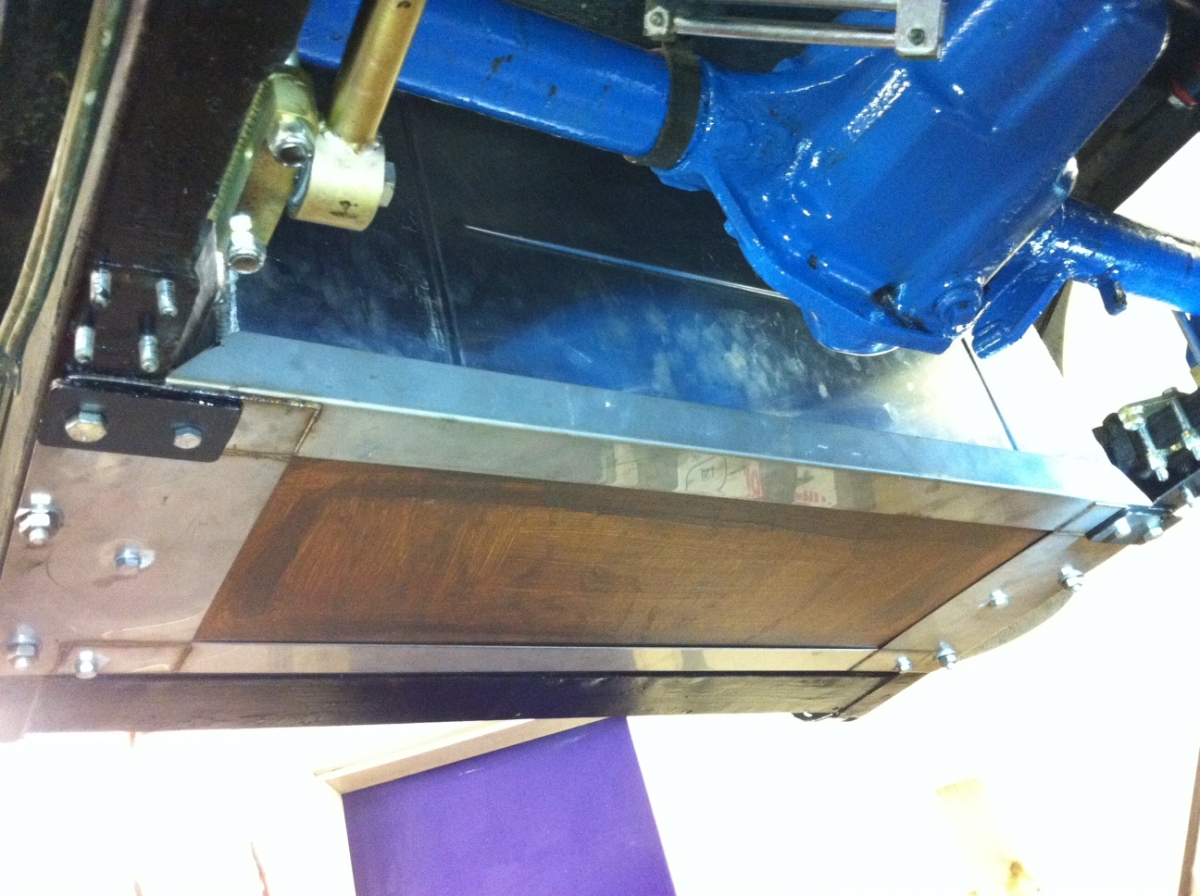 Once in, we took a look at the space between the diff and the tank, 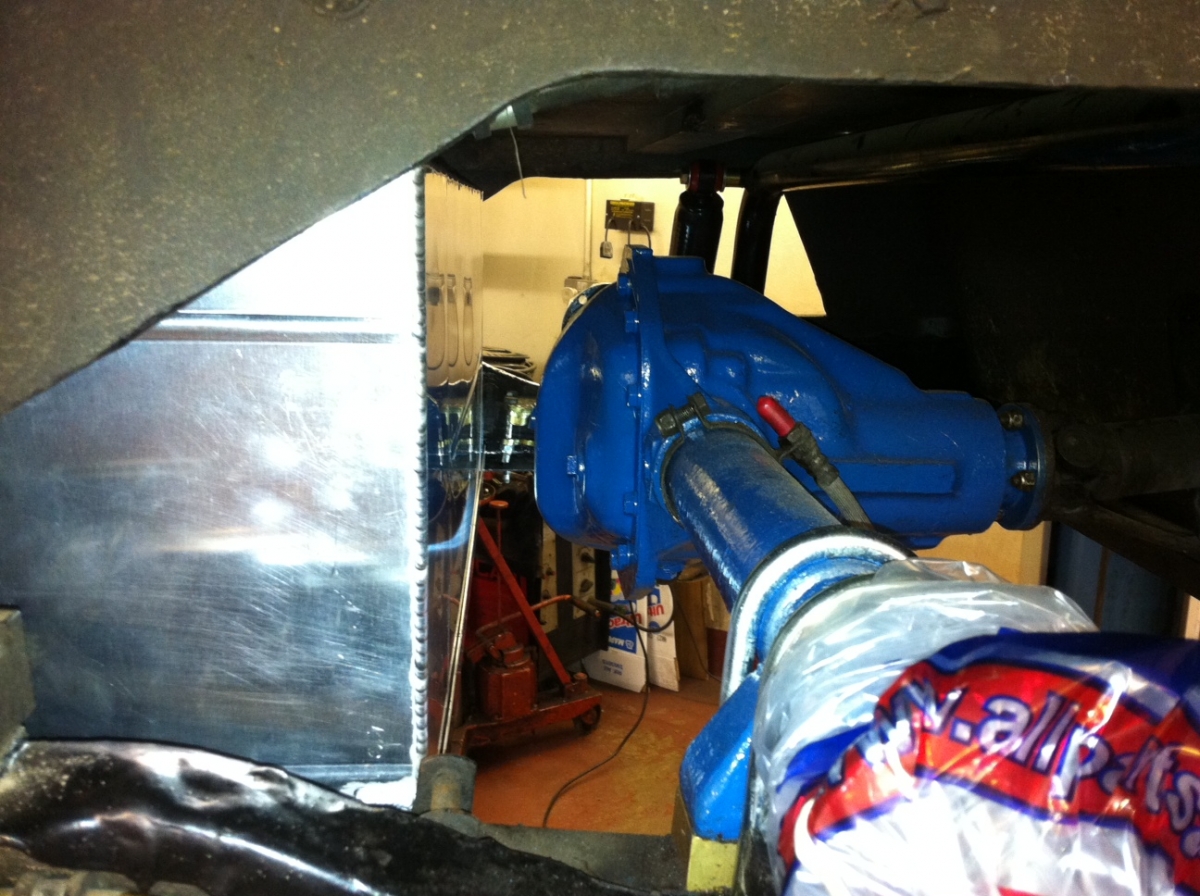 there was a moment of concern about the handbrake actuation leaver, which sticks out to the rear of the axle, this also needed to fit!! in the end, we modified the actuation leaver slightly and also found another piece of ali to act as an armour plate to attach to the tank just in case (don't want risk puncturing the tank for any reason). 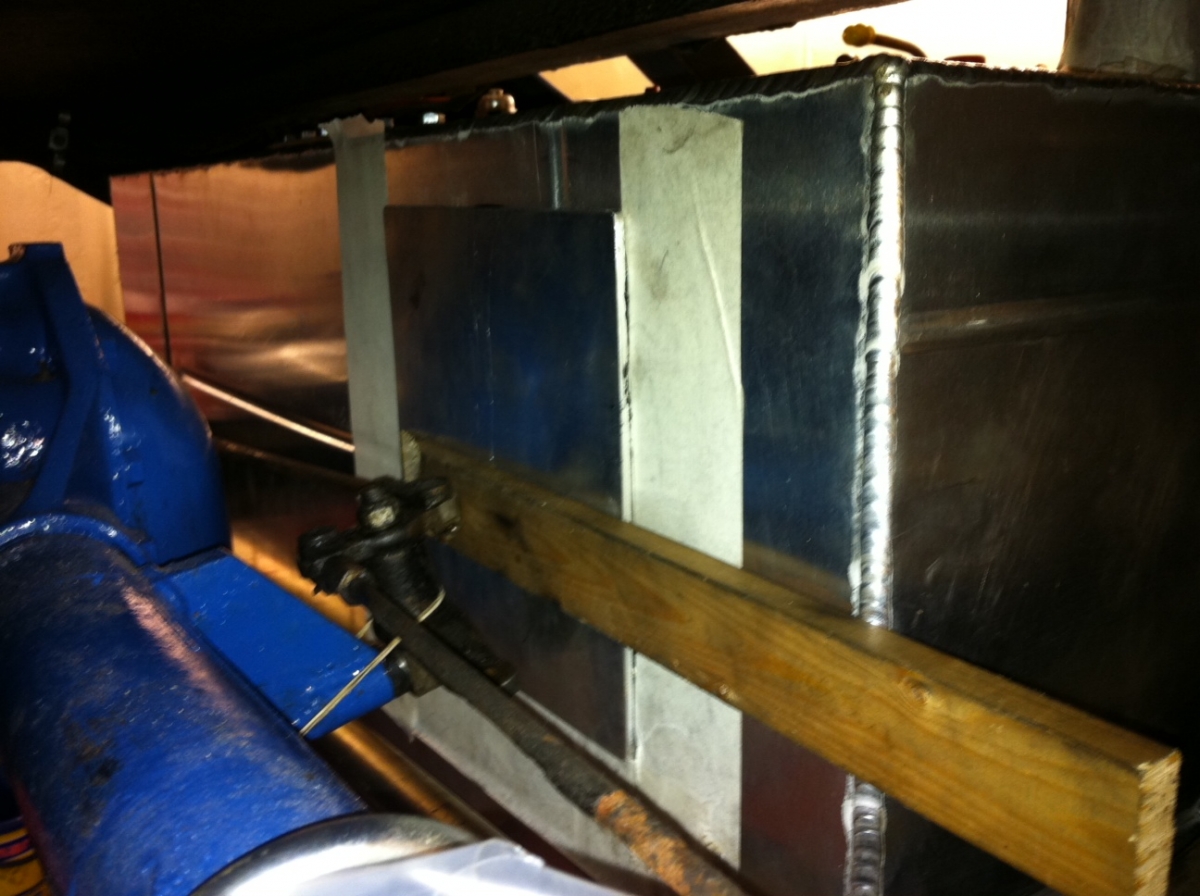 I managed to pop down to a local professional hose attachment supplier to get some advice, help and fuel supply parts. Having evaluated the Goodridge ali attachments and PTE Vs. Rubber armoured hose, in the end I opted for steel attachments crimped onto rubber armoured piping. The Goodridge system uses a proprietary size hose and it's REALLY expensive as well the PTE piping (Goodridge or generic) does not really want to bend much so I'll see how I get on with the rubber option. 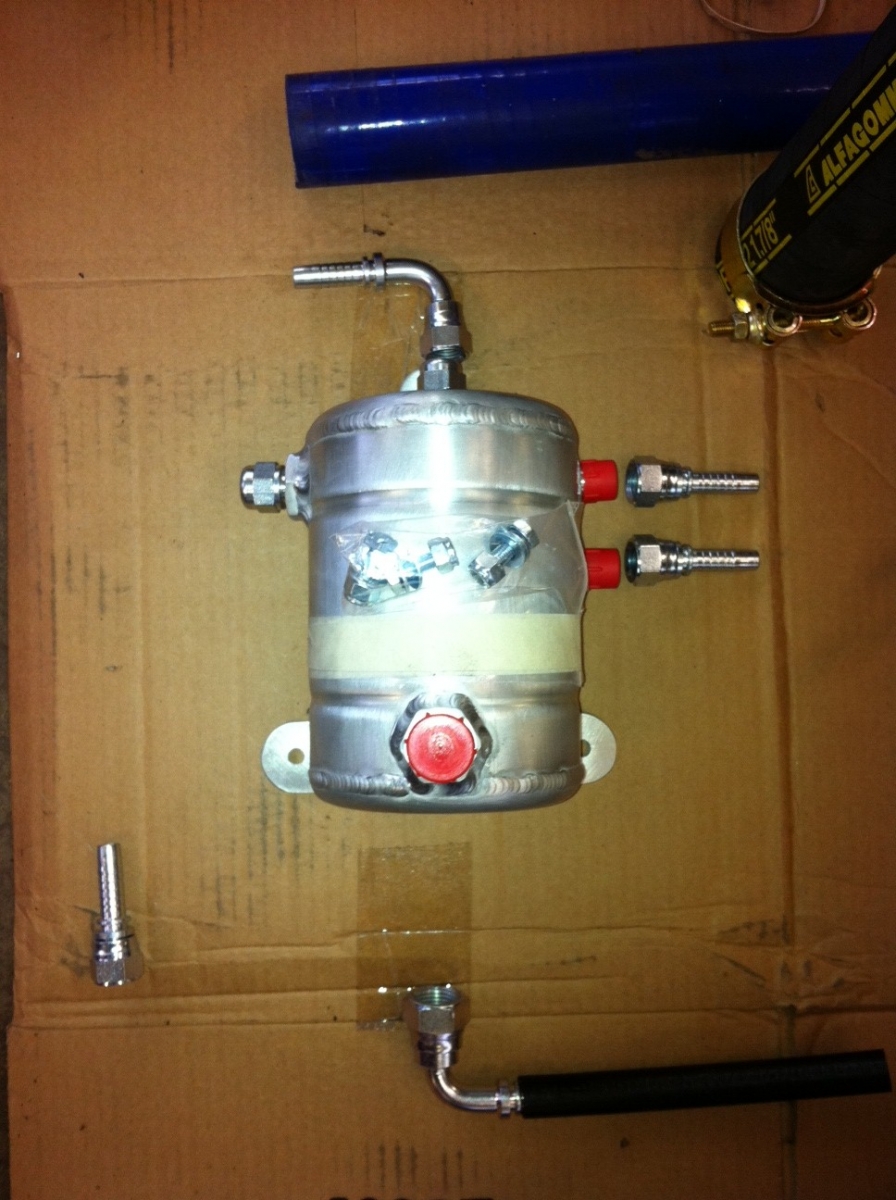 Swirl pot in situ. 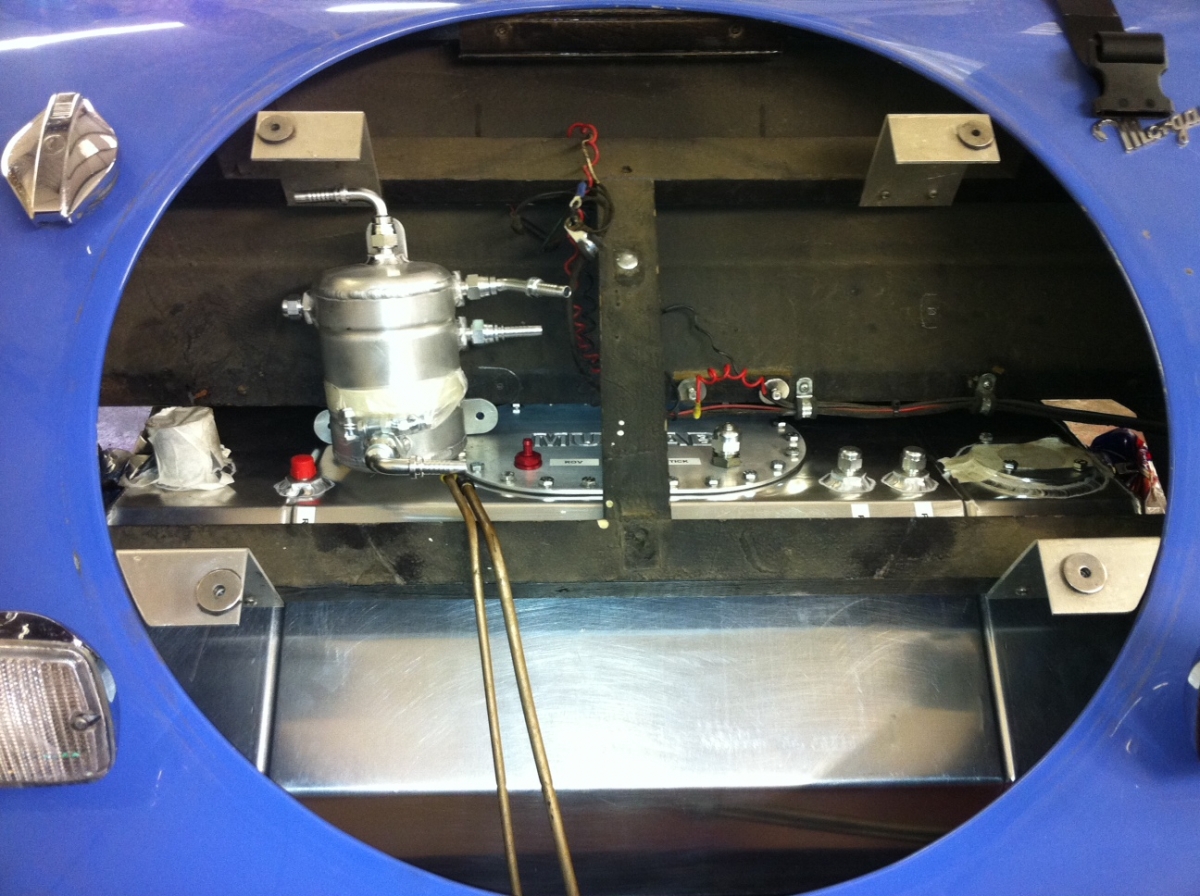 With all this in place we had to call it a day, whilst it does not seem much to fit the amount of got-ya's we've had to navigate has been significant and has drained time like nobody's business.
|
|
|
|
|
Joined: Feb 2010
Posts: 1,415
Has a lot to Say!
|
|
Has a lot to Say!
Joined: Feb 2010
Posts: 1,415 |
Phew! It fitted....
If anyone's interested- I took a series of photos as I was fabricating the tank- to show just what goes into making a Mulfab competition tank
Let me know if you'd like me to post them up
Simon @ Sifab.co.uk
Sifabtemporary@gmail.com
|
|
|
|
|
Joined: Oct 2006
Posts: 2,403
Talk Morgan Expert
|
|
OP
Talk Morgan Expert
Joined: Oct 2006
Posts: 2,403 |
Hey.... Would be great to see...
Add them into this thread and show what gets done!
|
|
|
|
|
Joined: Jul 2011
Posts: 3,643
Talk Morgan Addict
|
|
Talk Morgan Addict
Joined: Jul 2011
Posts: 3,643 |
Simon H definitely post your photographs there will be lots of us interested in seeing what's involved in making one of these tanks.
Ian
2011 Plus 4
Wild Mogs Reims 2019, Goodwood 2018, Isle of Man 2017, Carried on to Caramulo" 2016
|
|
|
|
|
Joined: Jul 2007
Posts: 28,413 Likes: 177
Salty Sea Dog Member of the Inner Circle
|
|
Salty Sea Dog Member of the Inner Circle
Joined: Jul 2007
Posts: 28,413 Likes: 177 |
Certainly will! Curious how much weight saving there is over a steel tank too? Andrew, the same applies as to building a kit car - allow at least three times the original estimated time (and cost!)  Seriously, looking good. Shame I won't be at the inaugural run at Ty Croes. Cheers,
Graham (G4FUJ)
Sold L44FOR 4/4 Giallo Fly
'09 Gen2 MINI Cooper ragtop
'90 LR 90 SW
|
|
|
|
|
Joined: Apr 2009
Posts: 462
Learner Plates Off!
|
|
Learner Plates Off!
Joined: Apr 2009
Posts: 462 |
This thread is/was excellent reading and useful to me. I hate to think that it will soon end. A big thank you, Cerealsurfer!
Frank
1967 4/4 1500 Comp.
1935 Super Sports Barrelback
|
|
|
|
|
Joined: Oct 2006
Posts: 2,403
Talk Morgan Expert
|
|
OP
Talk Morgan Expert
Joined: Oct 2006
Posts: 2,403 |
Onto more work tomorrow... however, really exciting today, I went and picked up the new engine!! It's not completely built up yet but it's looking really smart.  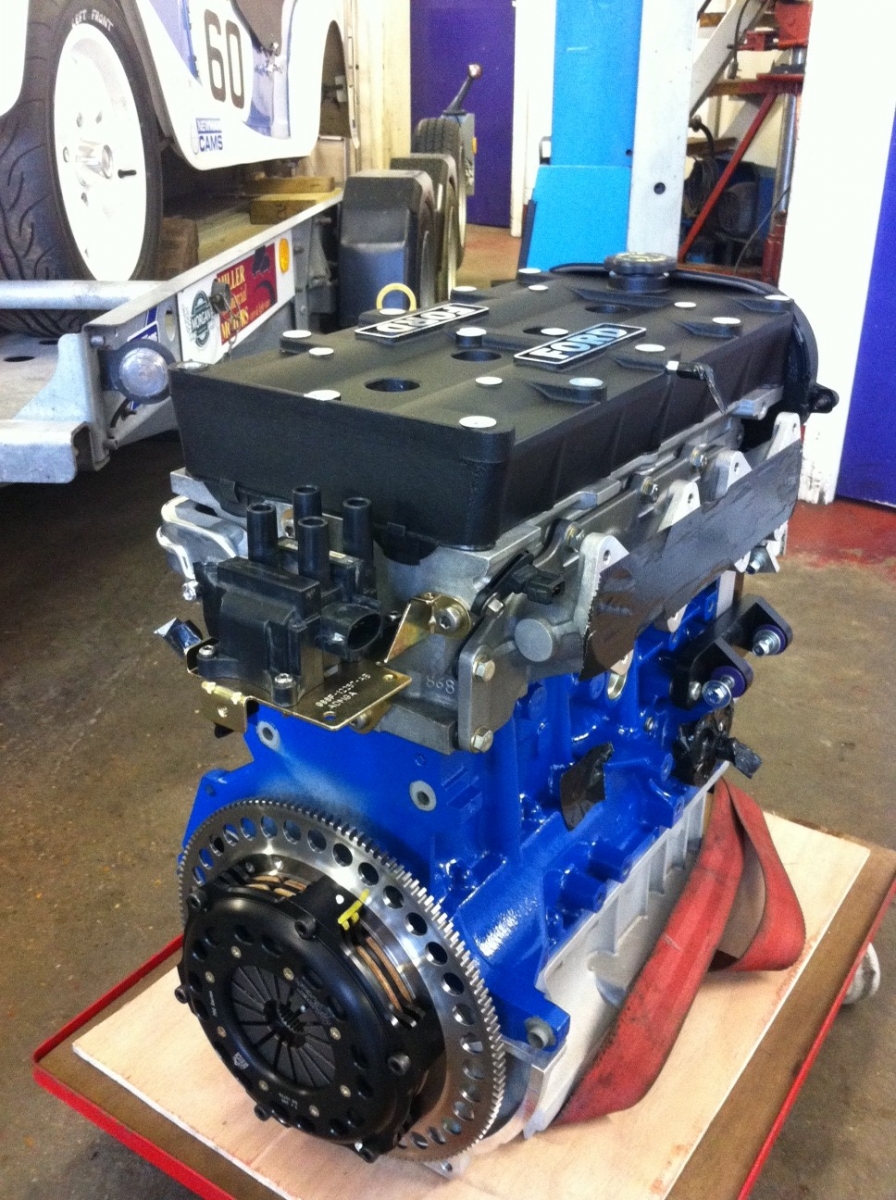 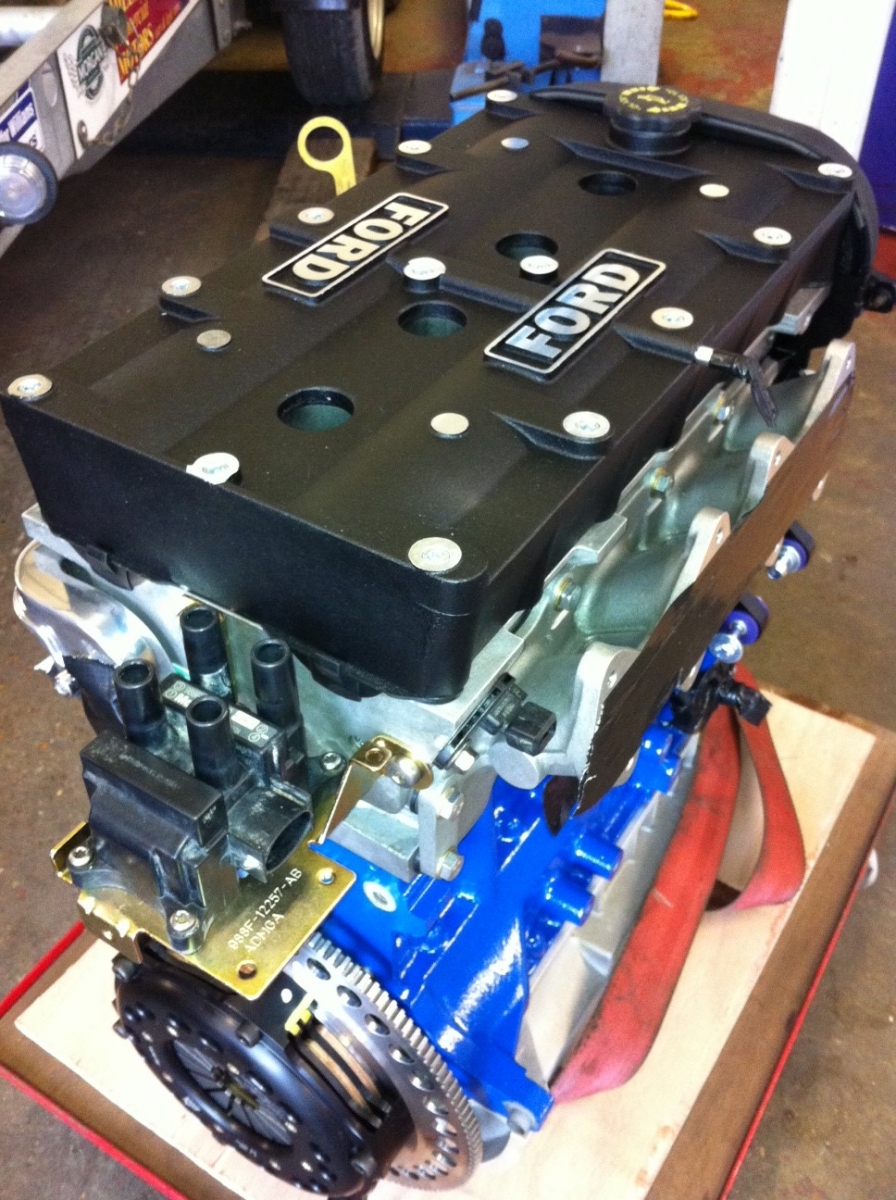
|
|
|
|
|
Joined: Oct 2006
Posts: 2,403
Talk Morgan Expert
|
|
OP
Talk Morgan Expert
Joined: Oct 2006
Posts: 2,403 |
Easter Weekend - Marathon UpdateSo this weekend there is a lot to do. - Finish back axle assembly now the shims have arrived
- Set up rear brakes
- Basic first fit on engine
- Test clutch
- Engine Bay Fuel system
- Engine Bay Cooling System
- ECU & Dash sensor set installation
Axle JB Engineering came up trumps with the axle shimms, their local engineer managed to whip up some shims at short notice. 2 x 1.7mm shimms for each side. Shipped overnight last week meant we could get onto this first thing. They worked a treat and we were able to box back together the rear axle and get the hubs re-assembled, brake drums etc. 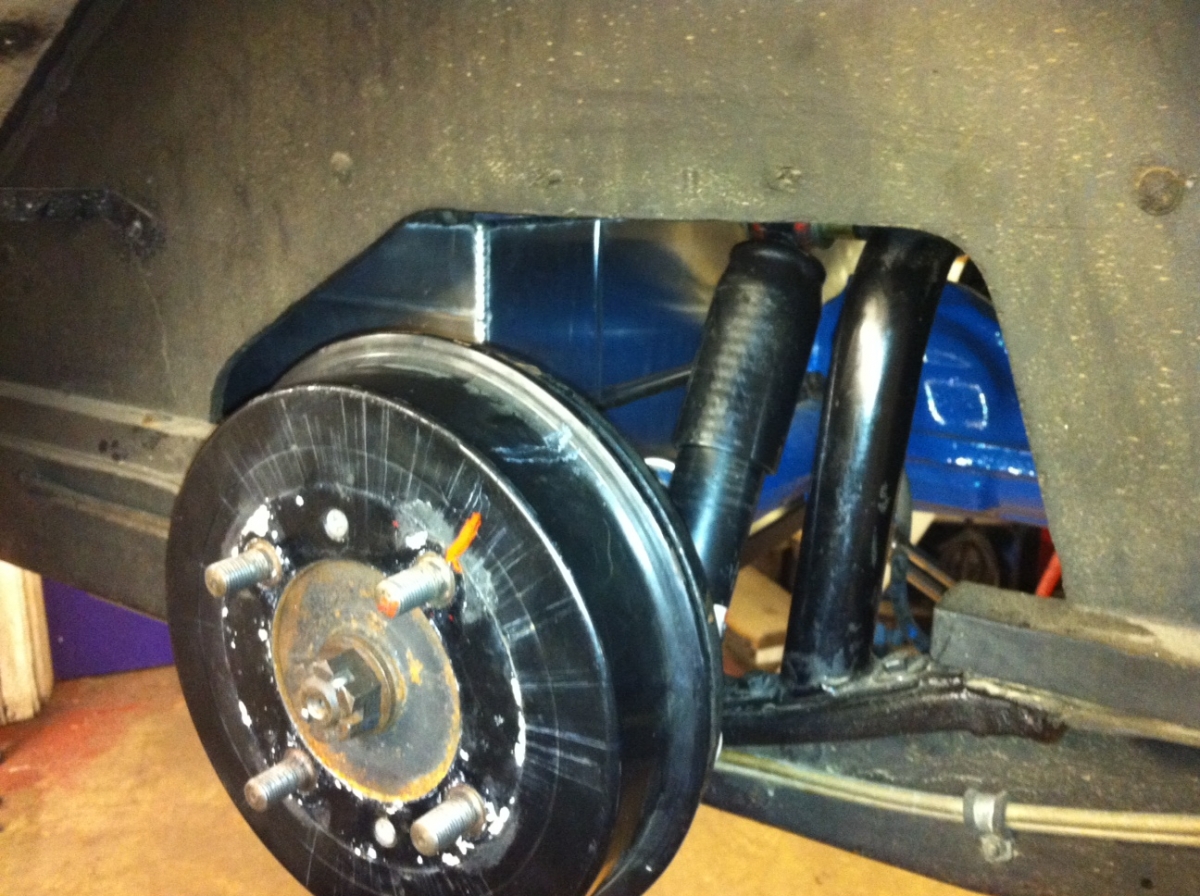 The armour plating on the tank worked a treat and with a minor adjustment to the hand-brake bracket there is space for movement with minimal risk. 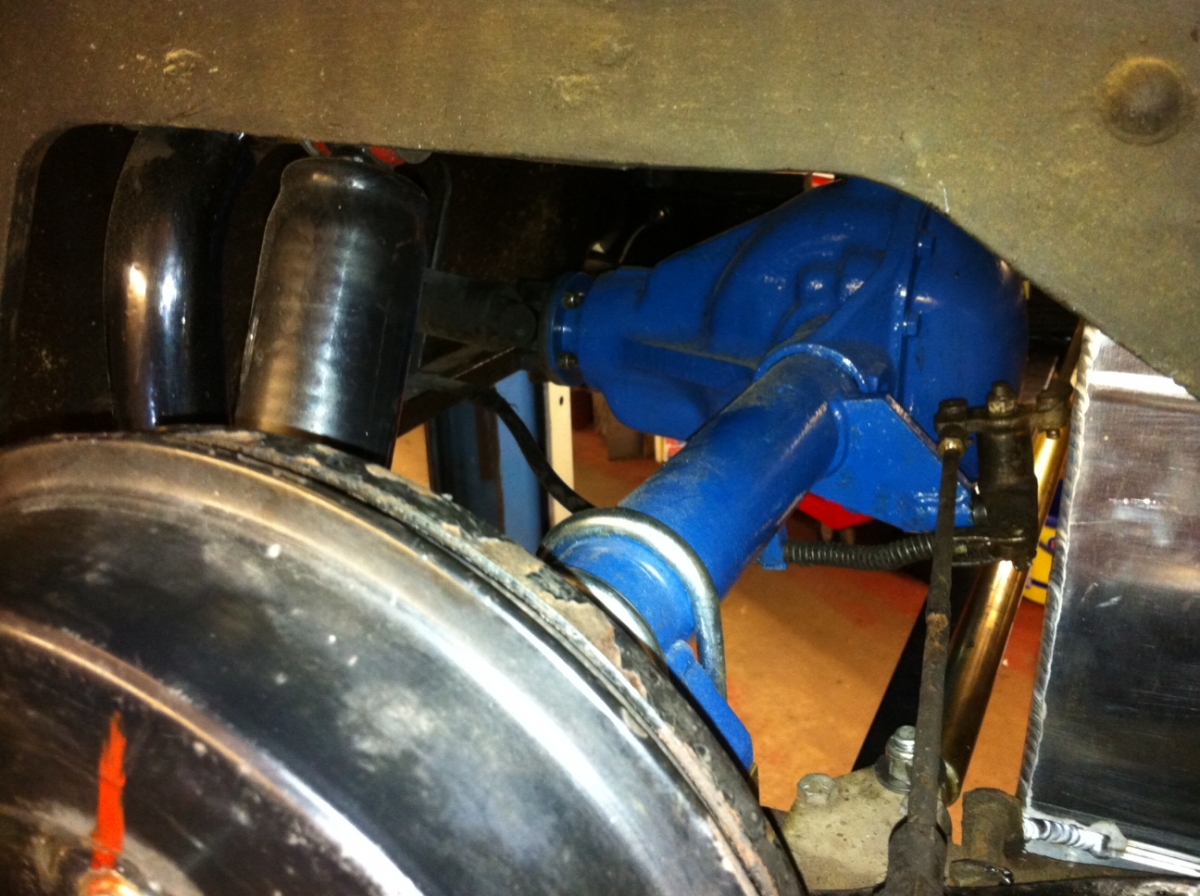 Basic Engine First Fit Basic Engine First FitOK so this could be complicated or not so complicated. Either way this was not going to be a simple job. On reflection it could have been a lot more complex. So... first thing was to look at the engine mount situation ont the engine side, secondly we need to check the bell-housing dust plate for bolt pattern and coverage. We happened to have a 1.8cvh to Type 9 dust plate and on Thursday a quick re-direct on a Cornwall to High Wycombe journey via the Morgan Factory sorted a set of rare aluminium 1800 Zetec blacktop engine mounts. So first up - checking the engine end.. the engine mount on the Off-Side was an easy fit straight on. just need to sort a set of bolts. 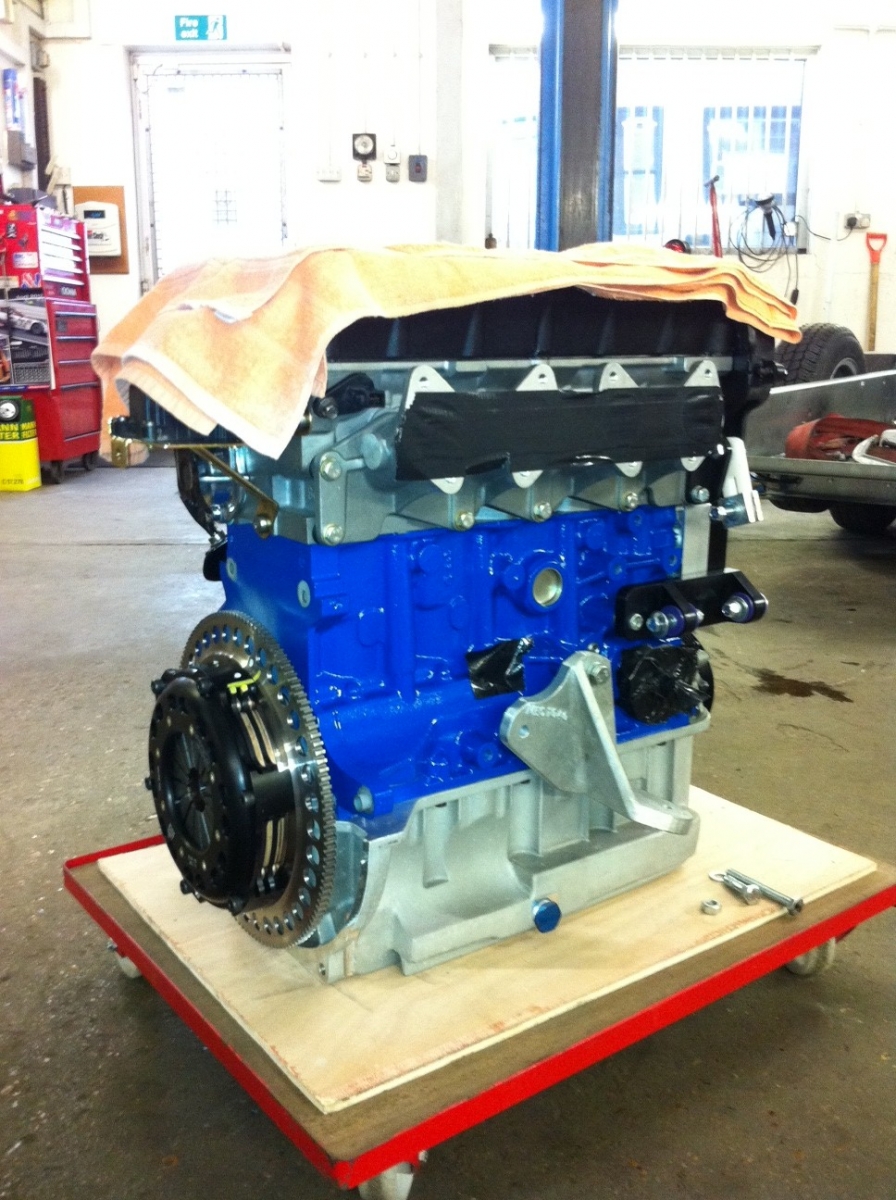 On the Near-Side things were going to be more complicated. The aluminium castings were missing one bolt hole and on the Back Top block there is a manufacturing tab which sticks out. Having thought about how to tackle this we decided to manufacture some custom spacers to hold the bracket in the right place. First up, drilling the final hole. 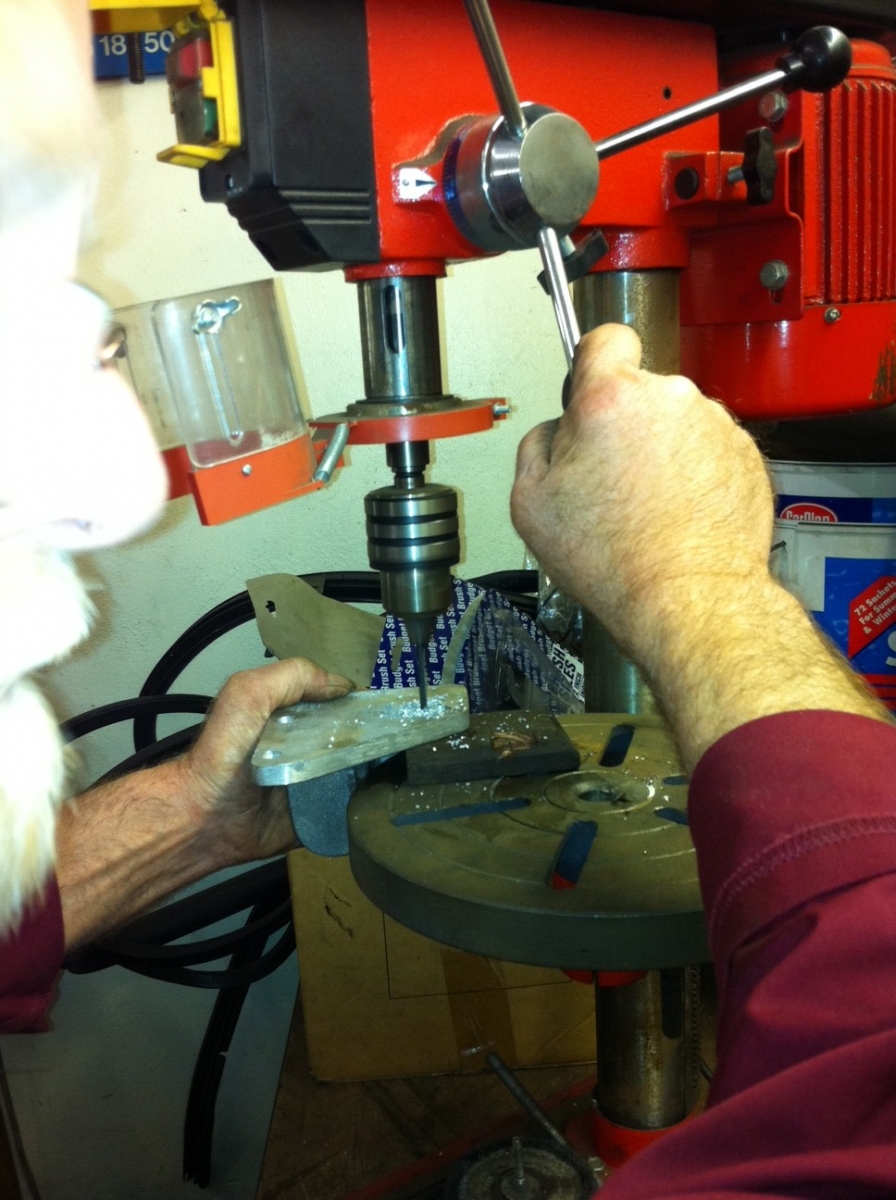 You can see the spacers in the picture below... 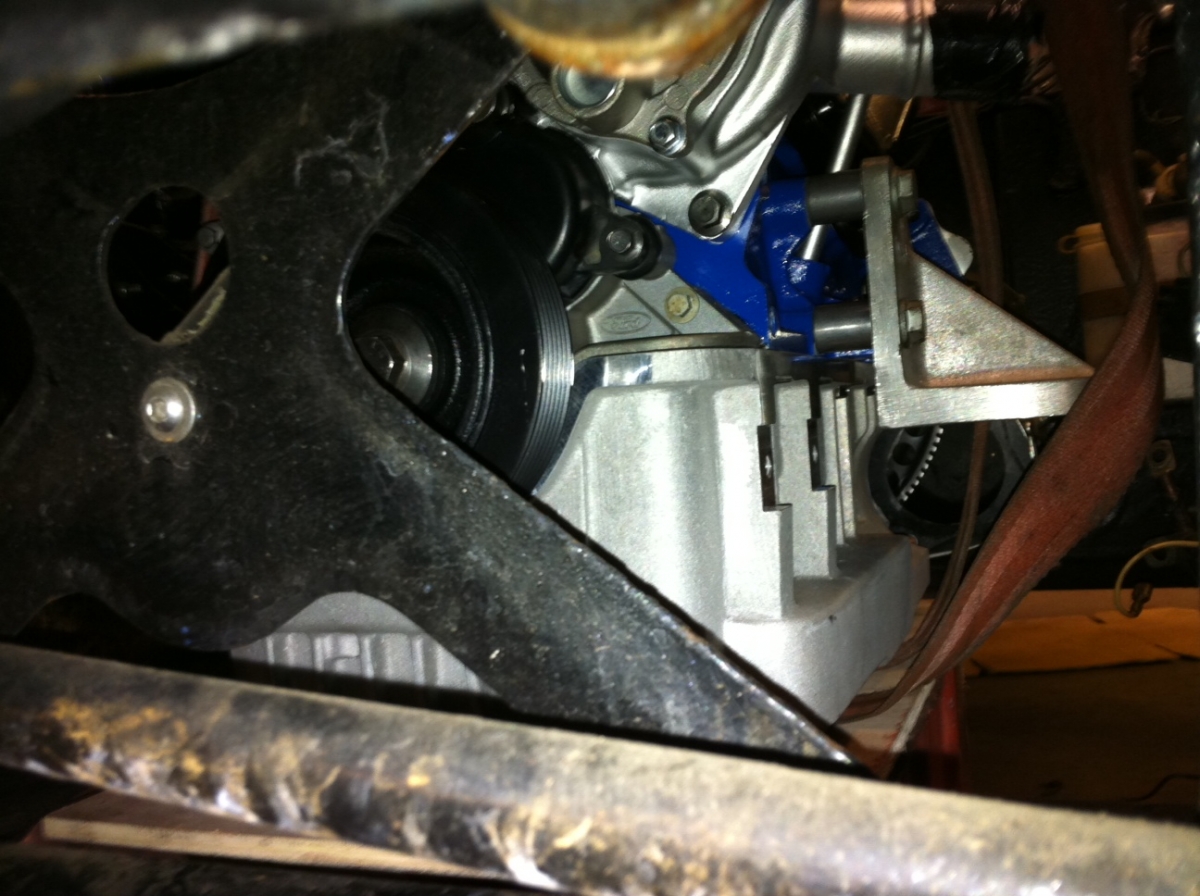 Once the upper brackets were mated to the engine the lower brackets need to be located into the engine bay and some way of connecting them together. 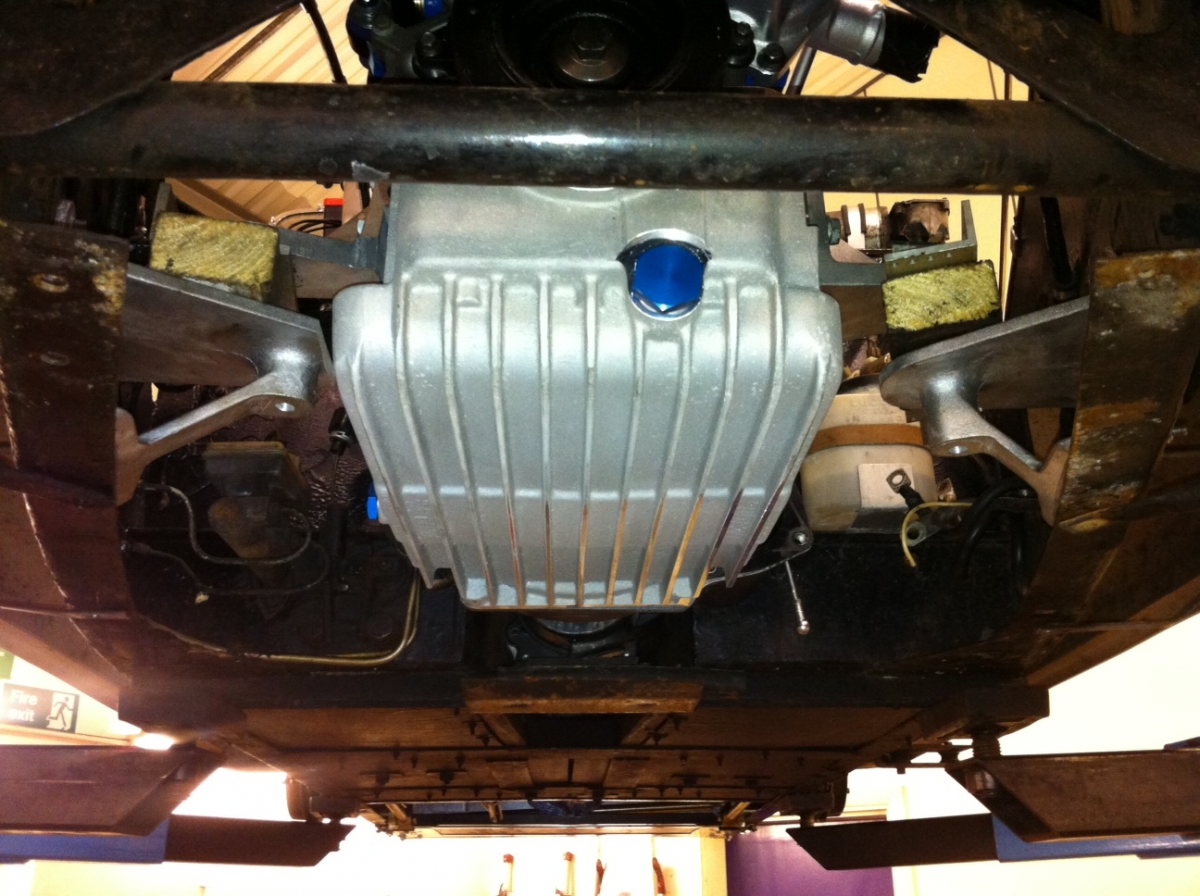 In the end we decided to re-use the new engine mounts we put on the car last year. however having lined the engine up in the engine bay at the correct height they were slightly too short. So I cut out 6 Aluminium spacers and put 2 on the bottom and 1 on the top to create the height required. Dad drilled and helicoiled the aluminium to make maximum use of the shape of the lower mounts and the existing holes already in them. 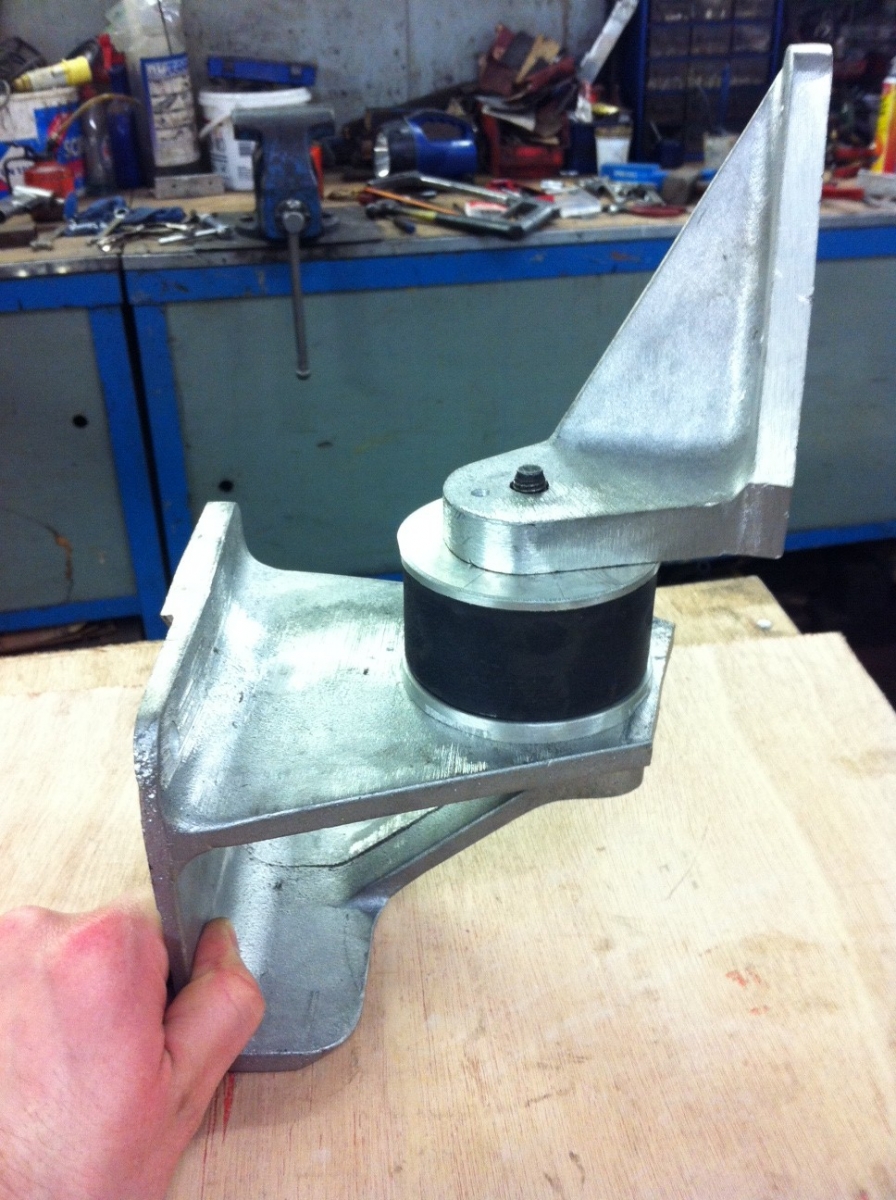 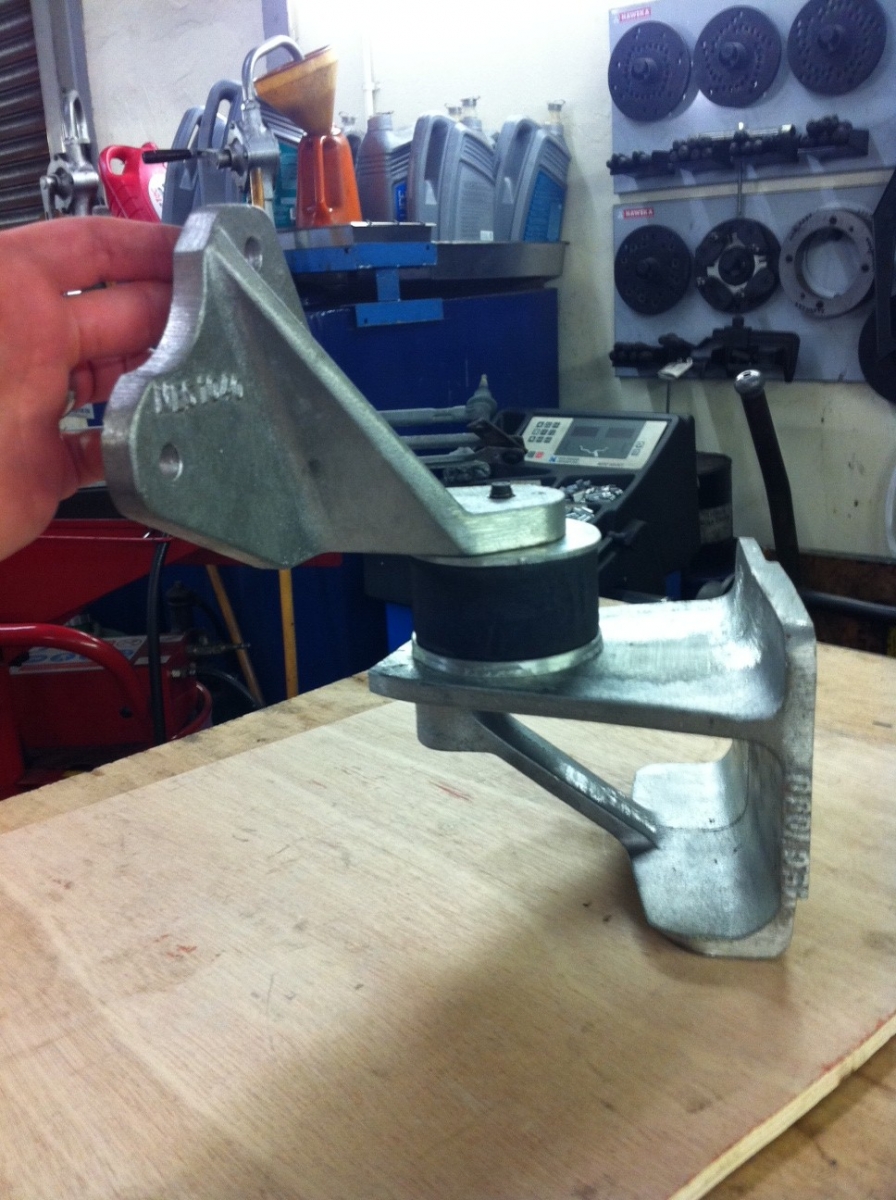 
|
|
|
|
|
Joined: Oct 2006
Posts: 2,403
Talk Morgan Expert
|
|
OP
Talk Morgan Expert
Joined: Oct 2006
Posts: 2,403 |
They look really smart mounted into the car:  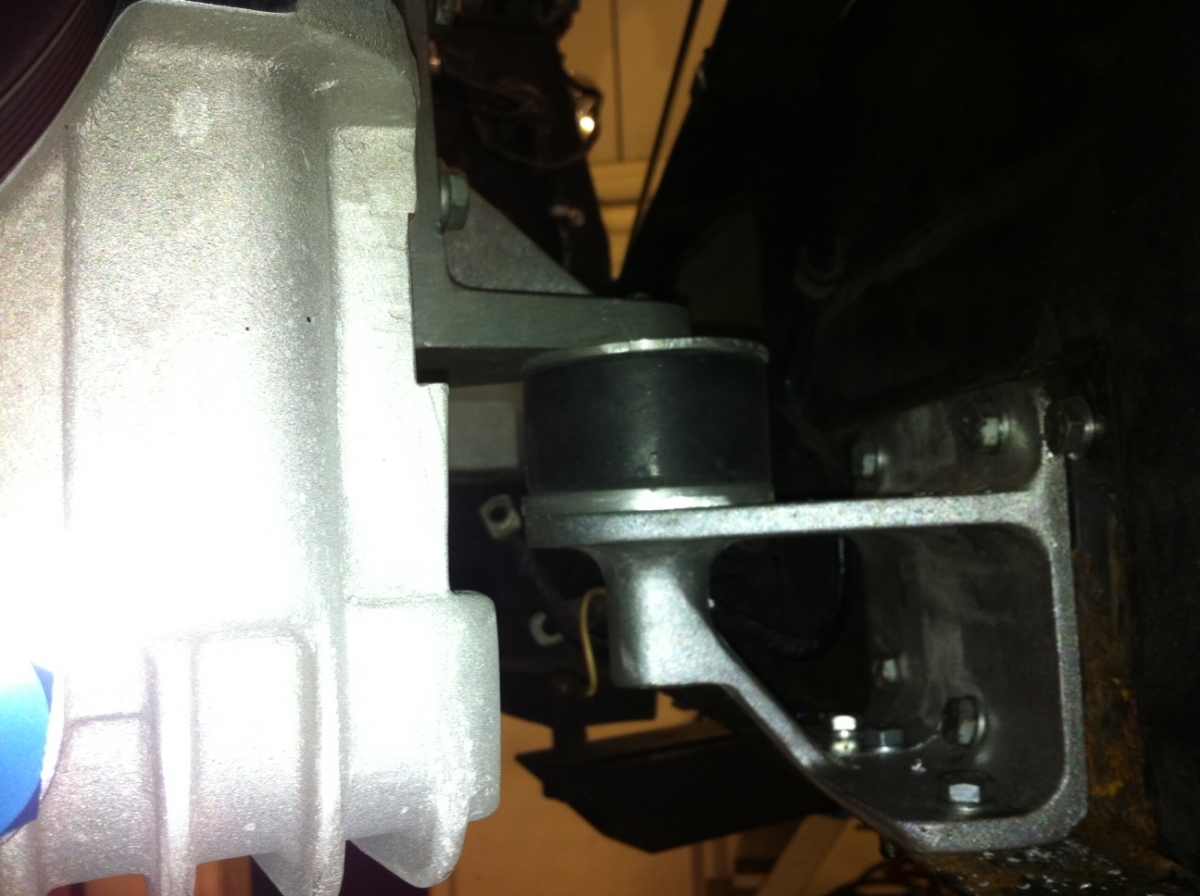 You can see their lateral alignment when looking up from underneath. 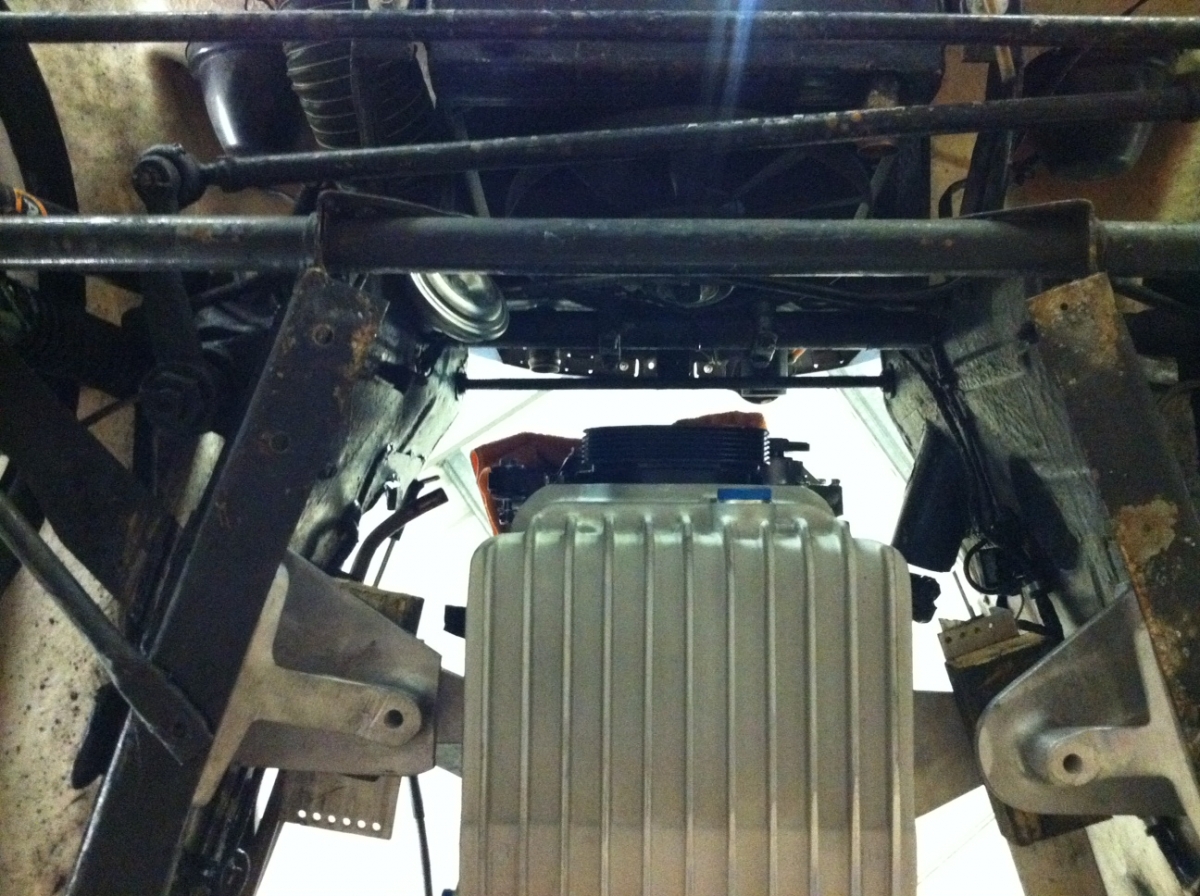 At the same time we used the 1.8cvh to Type 9 dust cover to check the mounts... it fitted fine with only minor adjustments needed, mainly due to the thickness of the Aluminium casting of the sump. Two minor tabs needed to be trimmed. 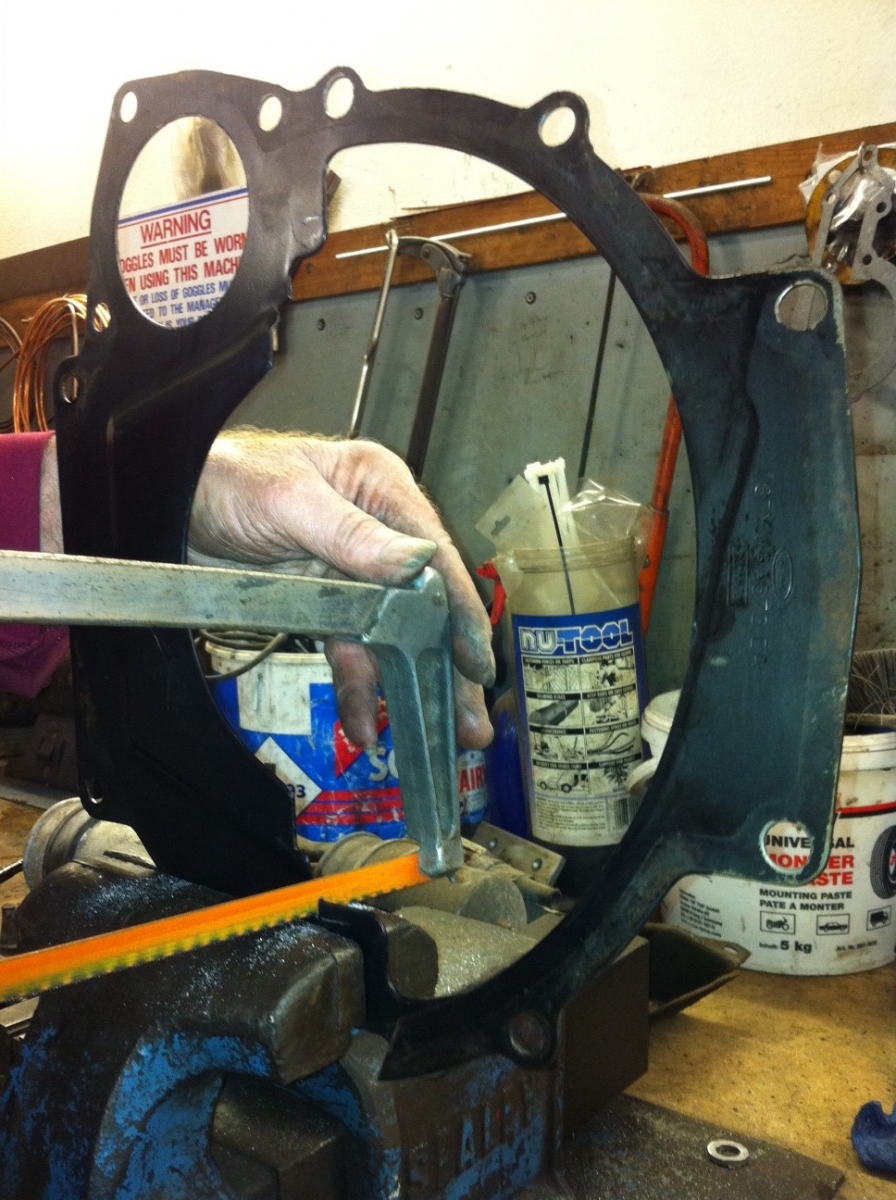 We did note however a small plate did need to be made to cover a moulding difference on the O/S of the block to bring it out to the bell-housing. You can just see the hole on the pic below. 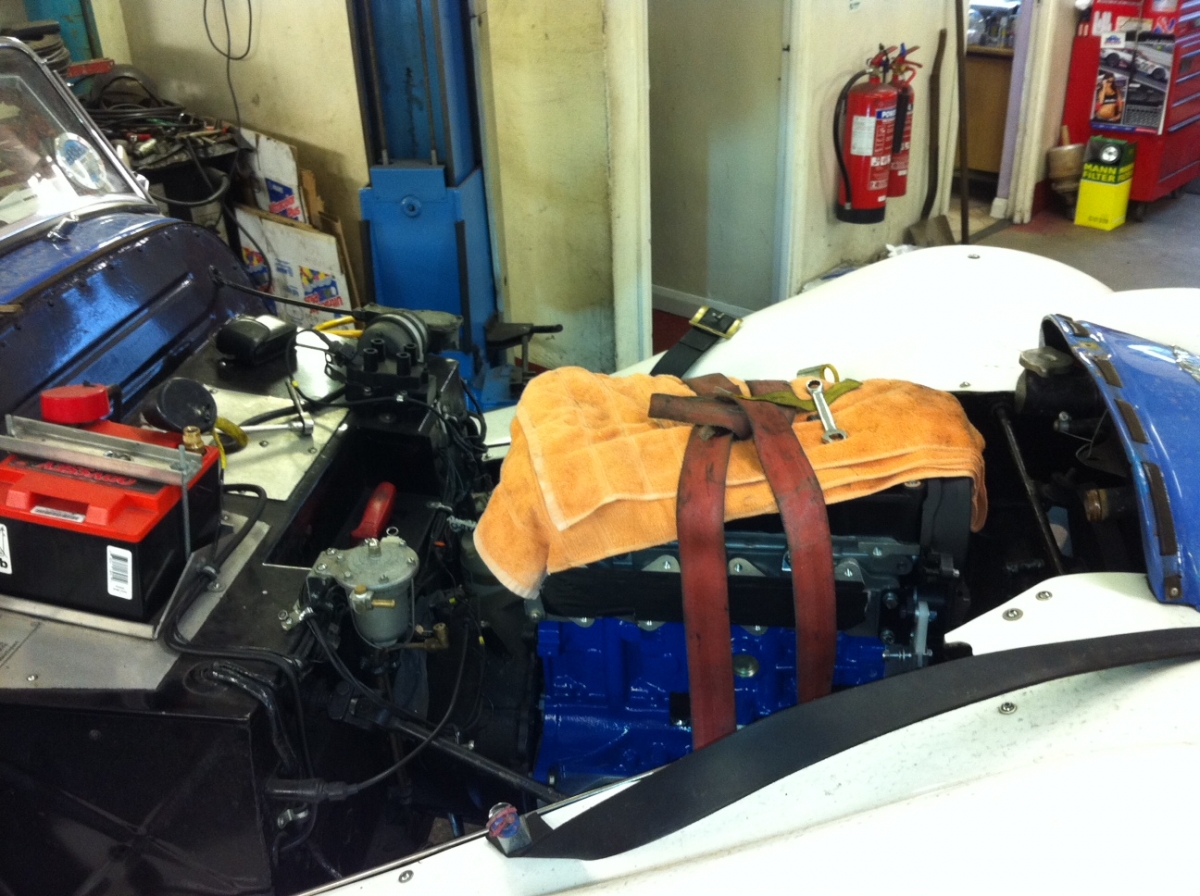 Amaizingly this leaves us after one day with the engine mounted - all be it basically in the engine bay. 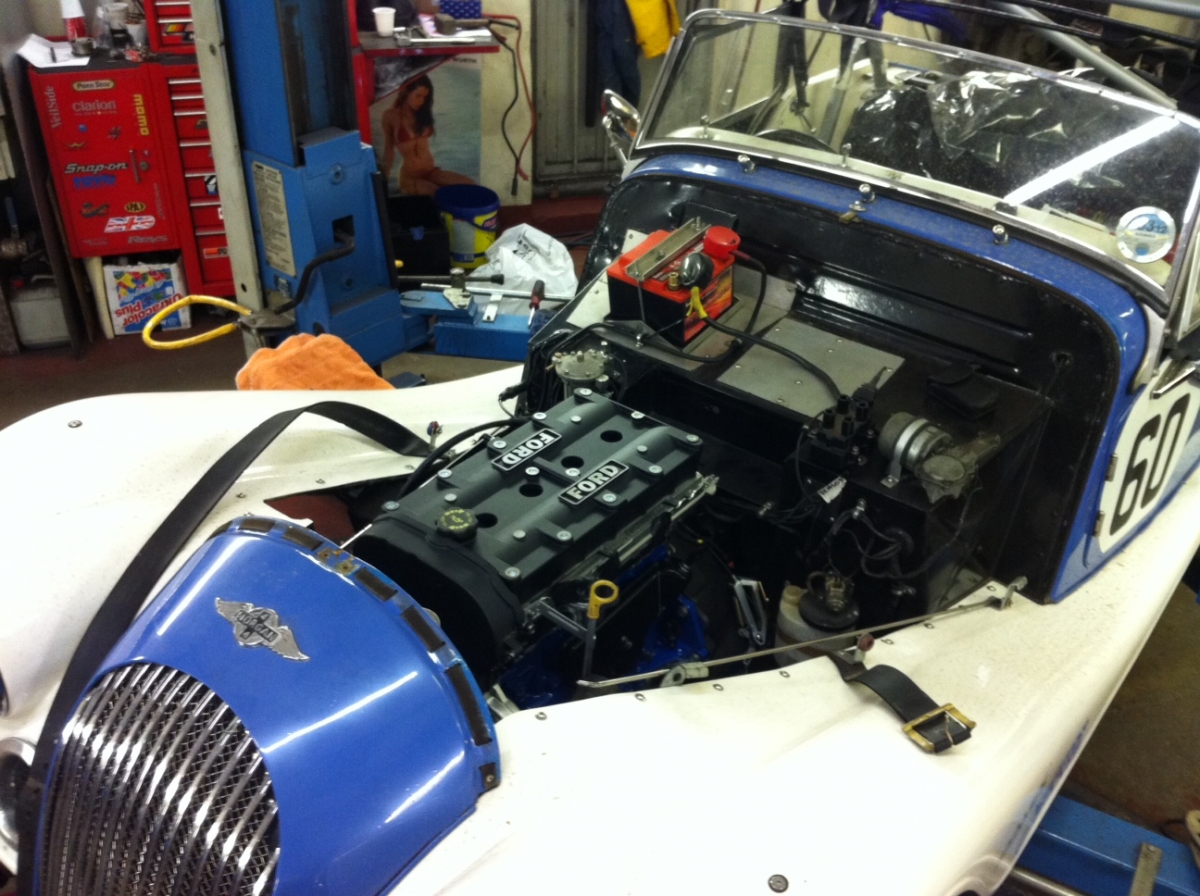 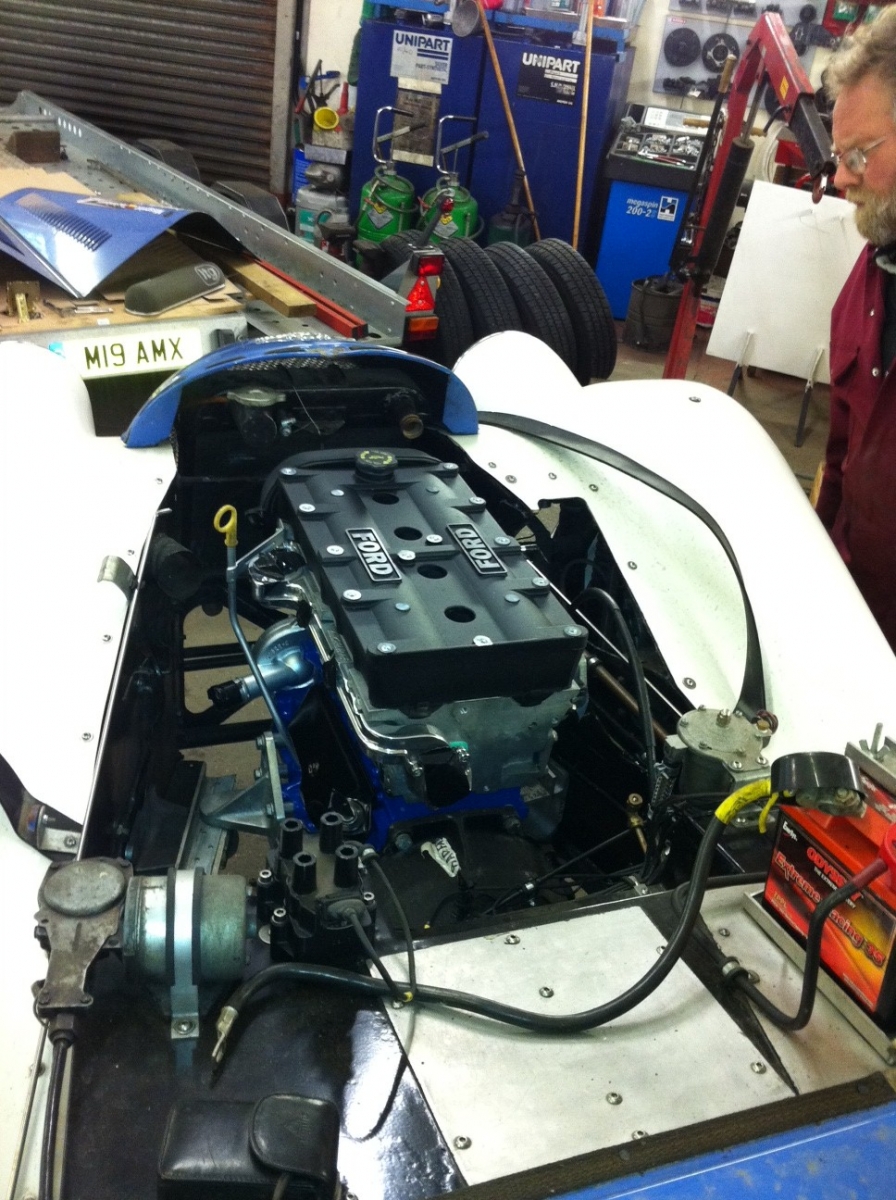 For a bit of a distraction, we decieded to make a new rear brake pipe. Once fitted this meant that we could bleed the brakes. 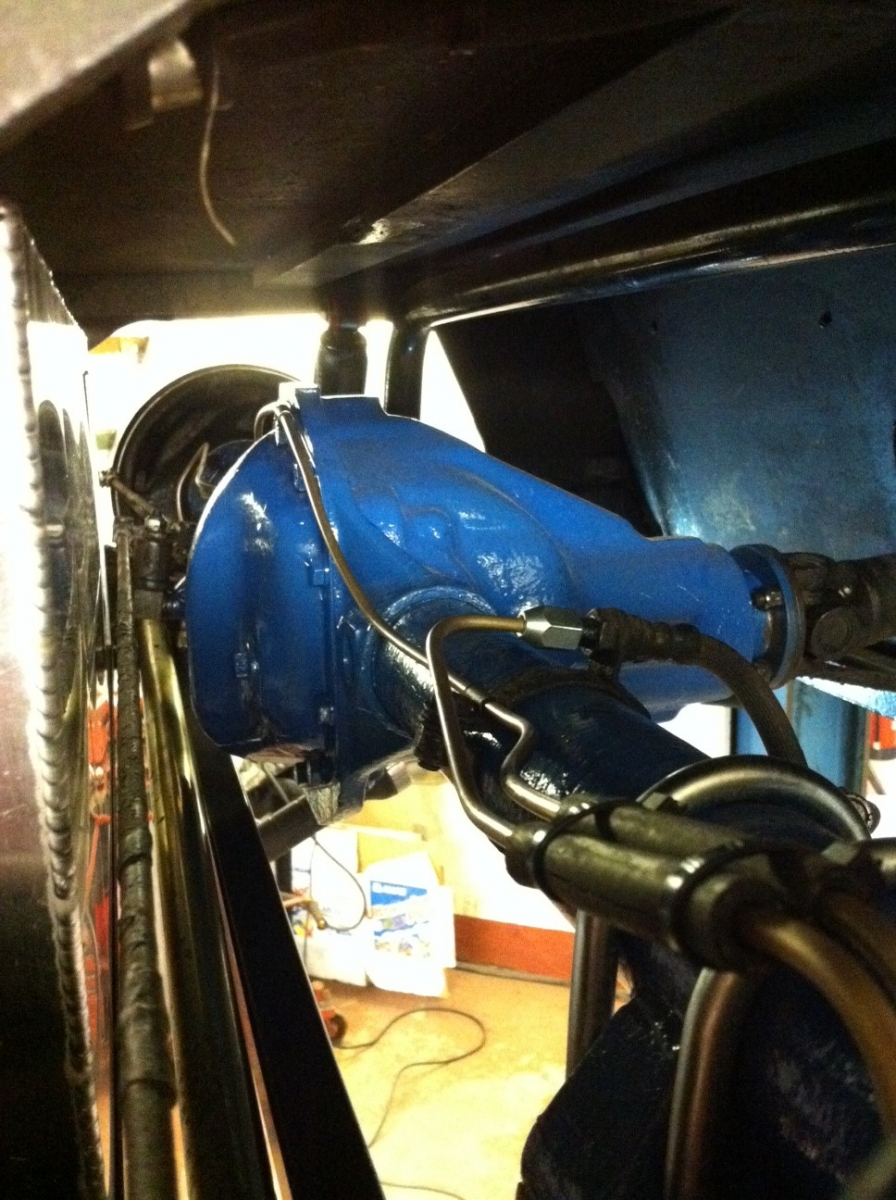 Not bad progress.
|
|
|
|
|
Joined: Oct 2006
Posts: 2,403
Talk Morgan Expert
|
|
OP
Talk Morgan Expert
Joined: Oct 2006
Posts: 2,403 |
Time to sort out fueling in the engine bay.... Out comes the Twin 45's set-up from the old car. The PiperCross induction system is not going to work this time around, the rpm's this engine is likely to pull is, I suspect too much flow for this system and the spacing is wrong in the back plate. 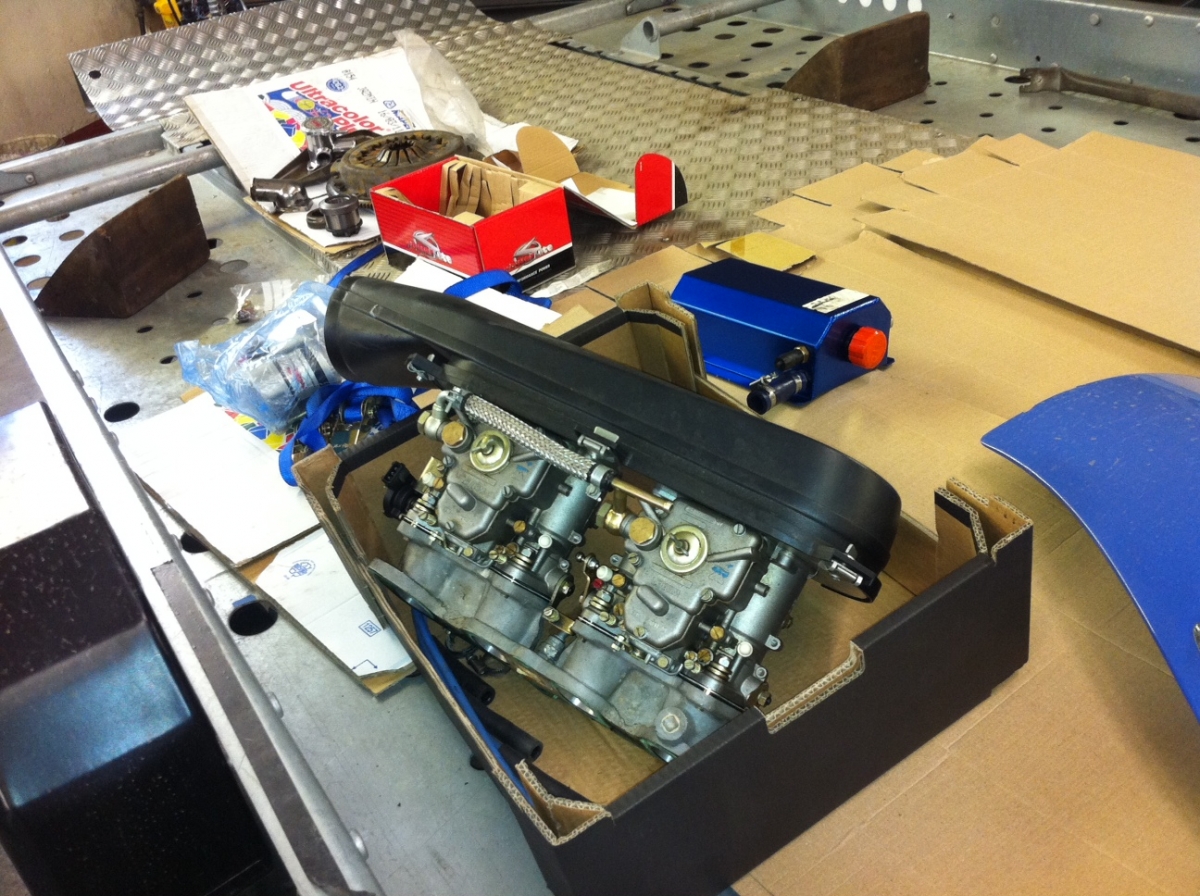 As an alternative set-up I've decided to start with a full ITG Race Filter - interestingly the one I've gone for is from a Cosworth DFV F1 engine. It's not designed to be used on the road. So down to stripping down the old set-up. First-up, taking the housing off. 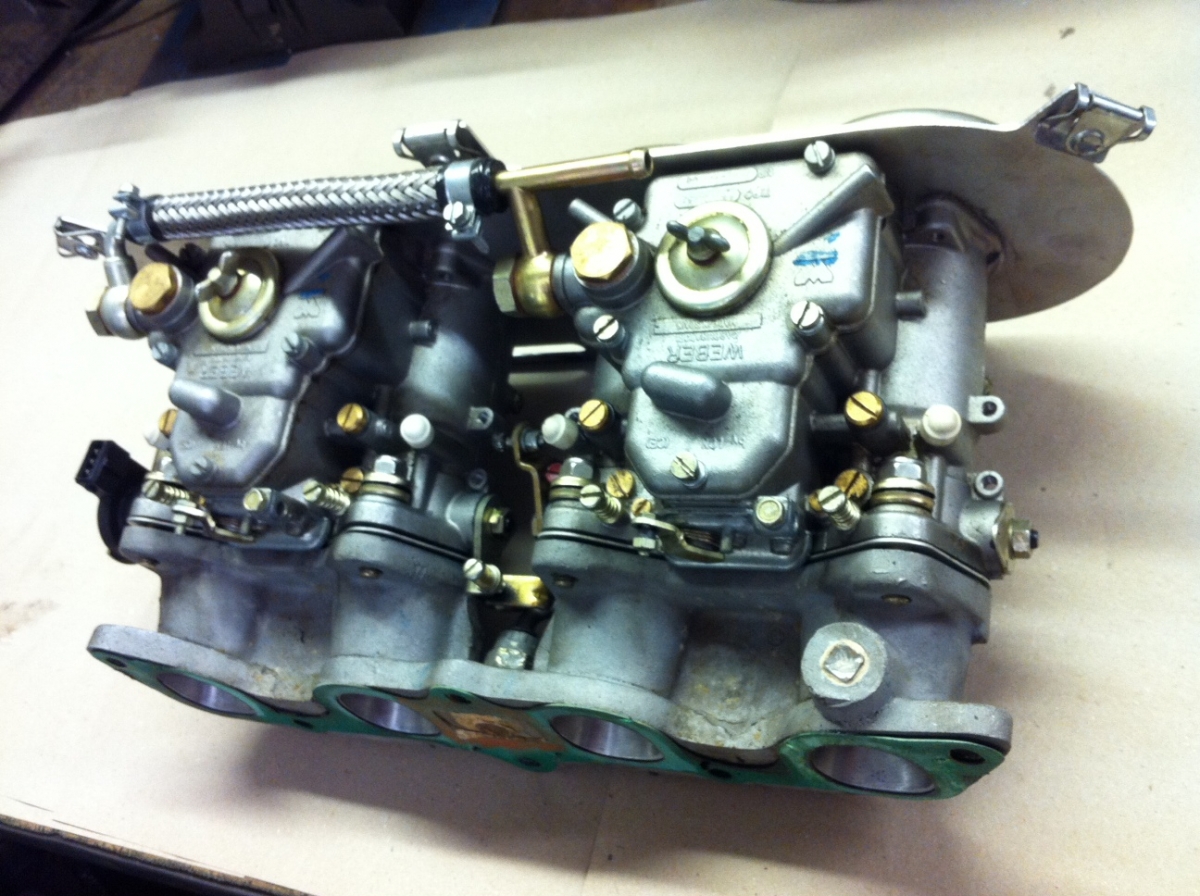 Secondly, dismantling the intake manifold. 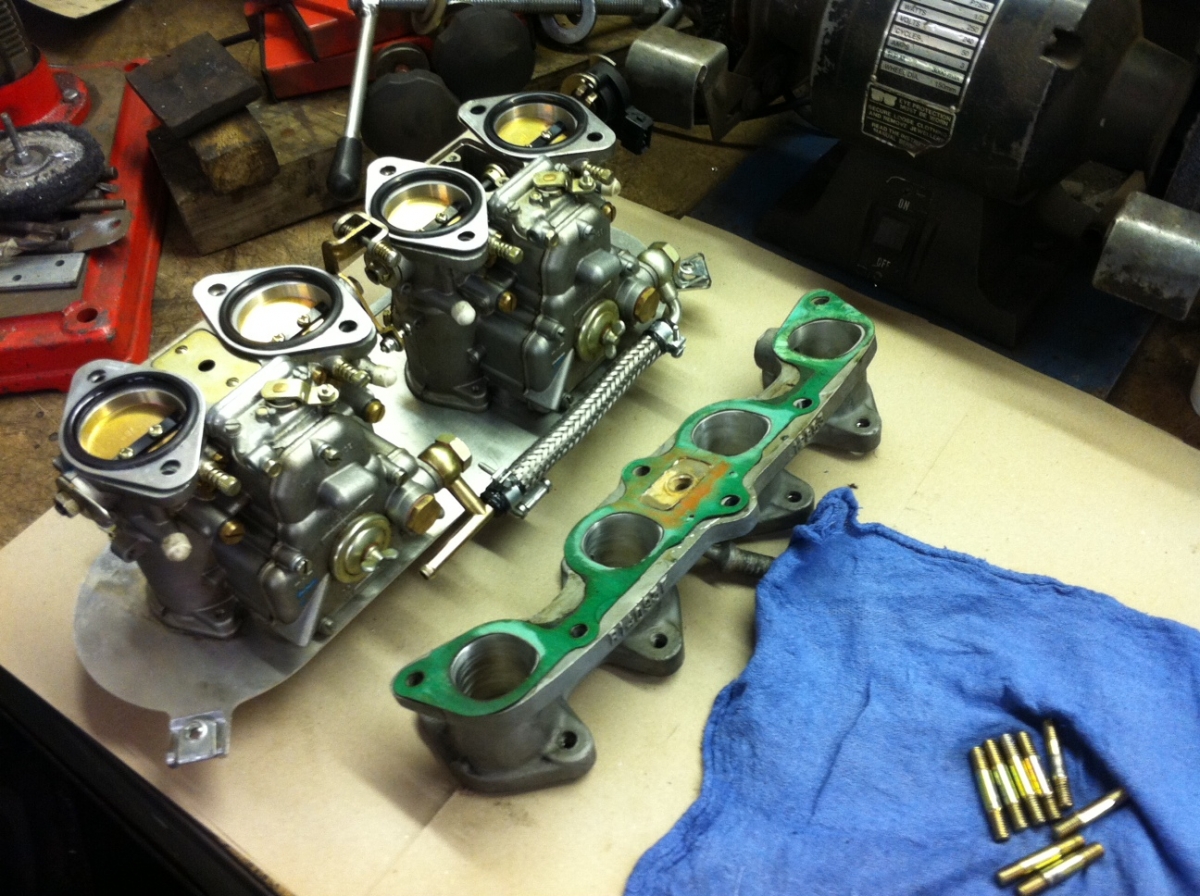 To re-assemble the carbs on the new manifold the central cast spar between the centre two intake tracts needed to be cut out to allow the throttle balance bar to rotate. Also the balance bar tab needed to be trimmed slightly as the central intakes are about 5mm closer together. In addition the new back plate blank needed to have all the holes cut out. Try cutting out 8 trumpet attachment holes, 4 x 51mm intake holes and 2 x 14mm breather intake holes all in the right place. Do I sound smug!! I should be, I managed to get them all in just the right place in one hit, no final fit adjustments needed. Trumpets installed, looking good. 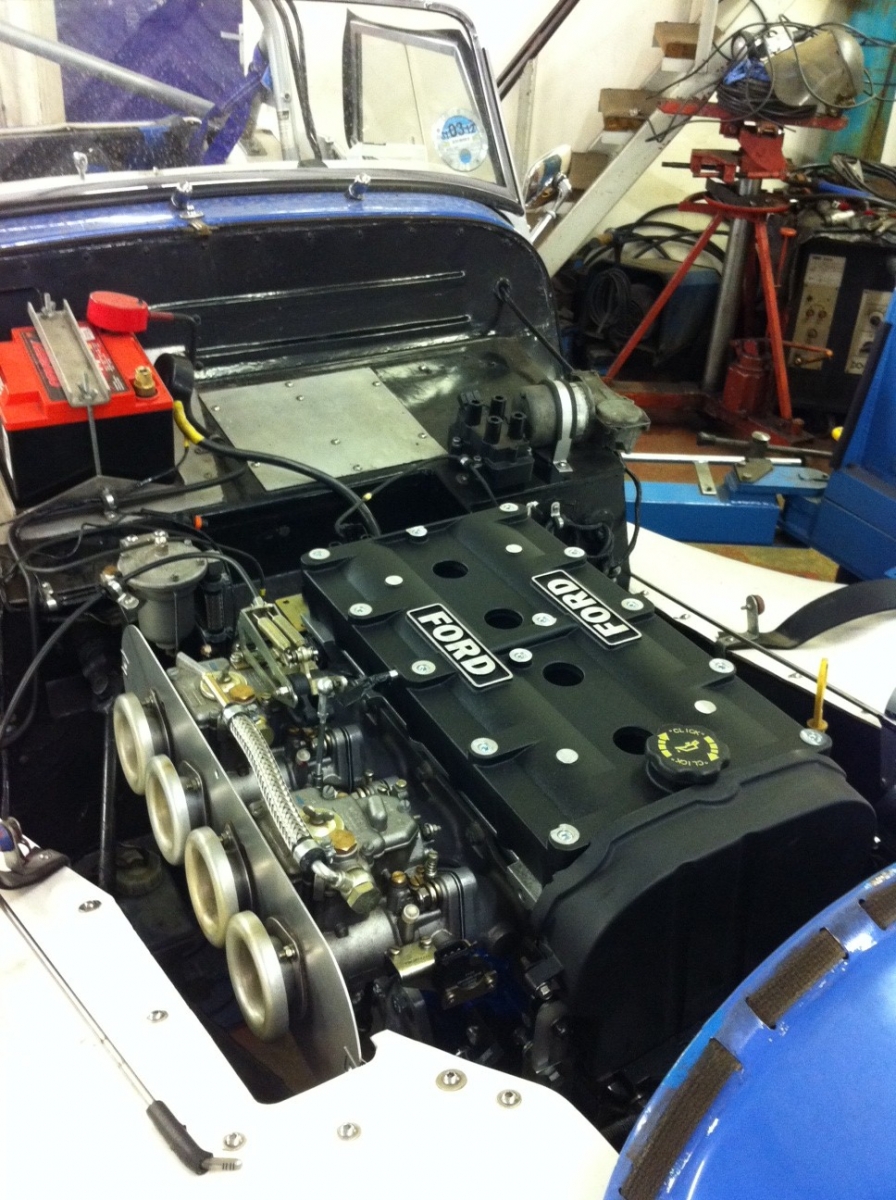 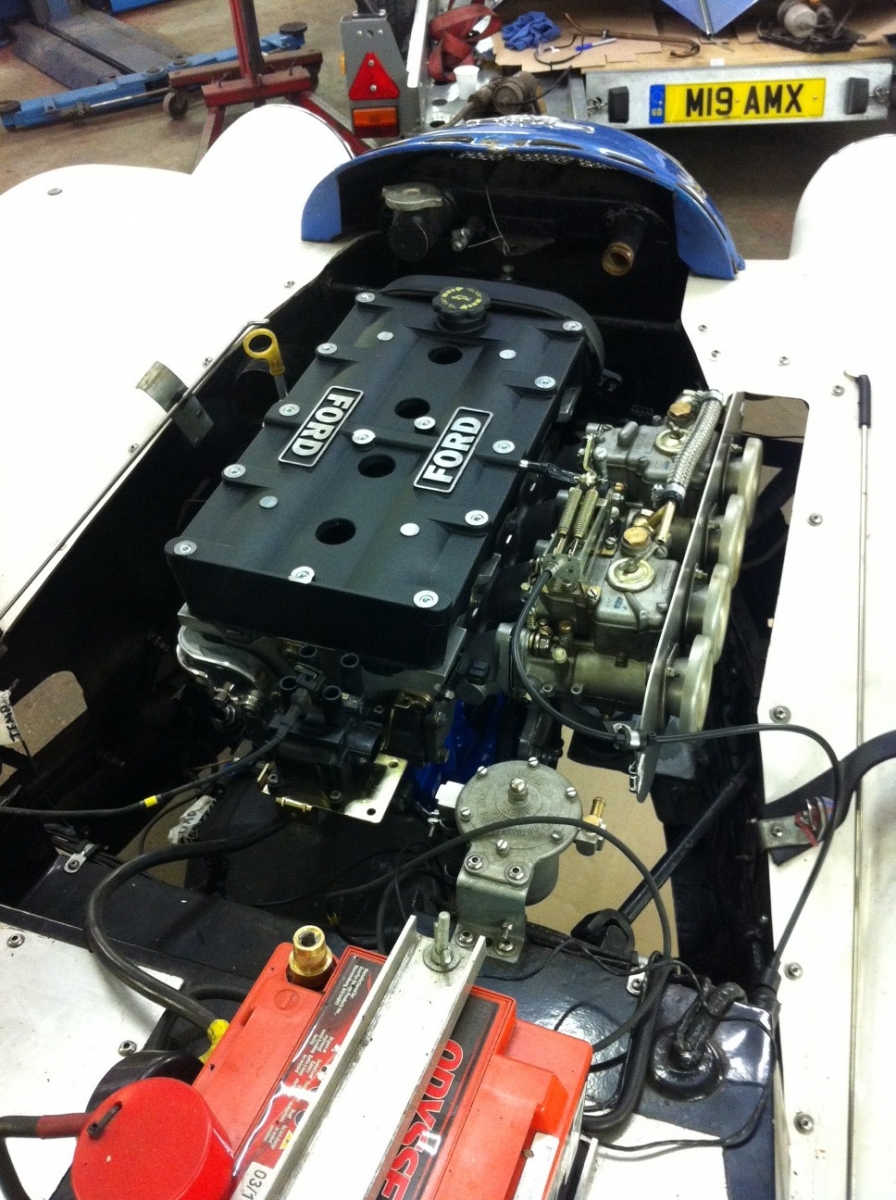 We re-attached the throttle cable routing tag and trottle linkage. fully operational. Will need to get some 40mm chokes to replace the stock 38mm ones in the twin 45's at the moment. All the wheels are now back on... for the first time in about 5 weeks. 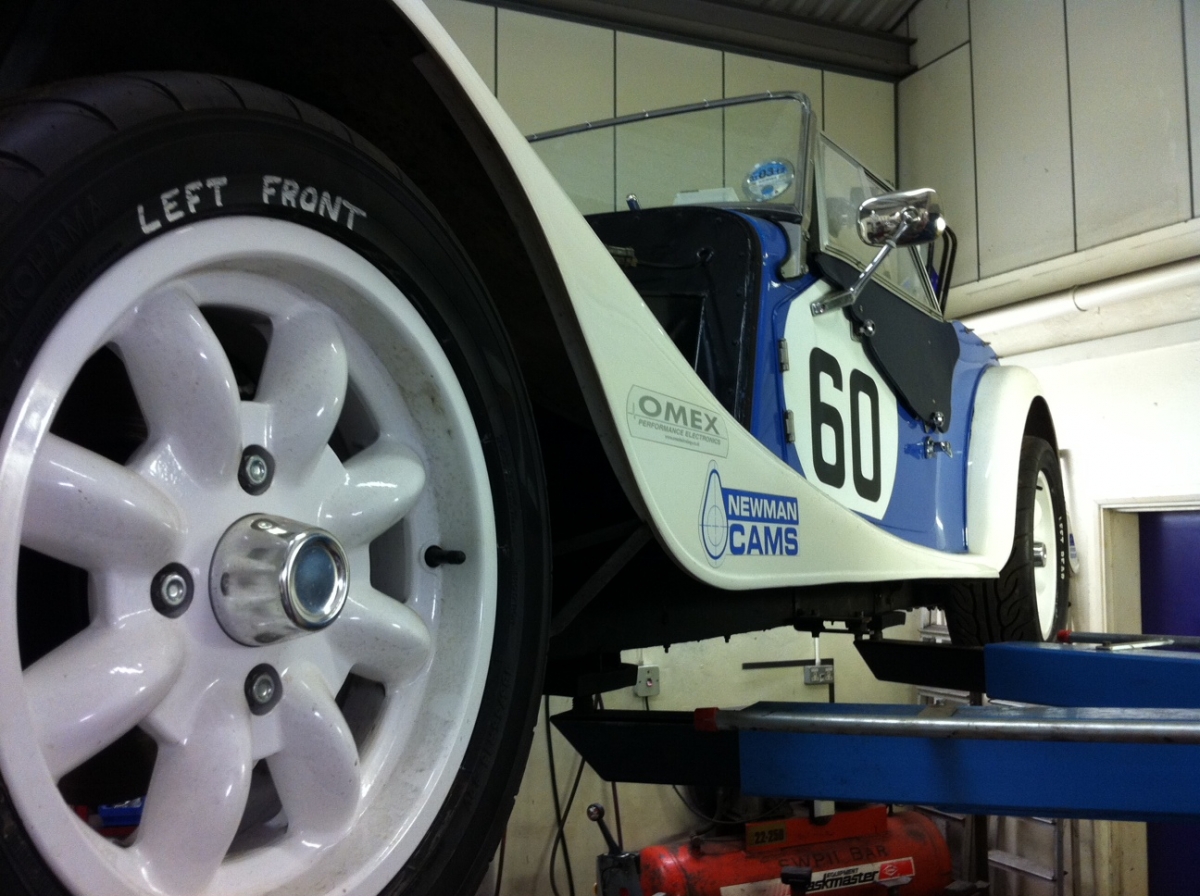
|
|
|
|
|