|
0 members (),
416
guests, and
63
robots. |
|
Key:
Admin,
Global Mod,
Mod
|
|
|
Forums39
Topics49,850
Posts837,427
Members9,596
| |
Most Online1,063
Jun 14th, 2026
|
|
|
There are no members with birthdays on this day. |
|
|
|
Joined: Apr 2013
Posts: 1,370 Likes: 11
Has a lot to Say!
|

Has a lot to Say!
Joined: Apr 2013
Posts: 1,370 Likes: 11 |
I just came back from the S&S mechanic who successfully replaced the cam belt. It took too long and cost too much. Three different sets of conflicting instructions out of S&S caused a bunch of confusion. Finally talked with one who knew just what to do and the correct order. The three 3/16" rods are vital and I now have a set. The cutout socket is nice but you can do without. I may just order a belt for the future on the proven theory that if you have one as backup you will never need it.
Tomorrow, after the carnage and gore, I will try to distill what we found out today in a useful instruction sheet. We installed the spacer washers supplied to bump out the cover. My now useless gasket will hang on the wall somewhere. Heat is the biggest culprit on these belts which is why S&S is recommending this. I feel it is a kludge since I really don't like the idea of 'stuff' being able to get in there. Air is well and good but the rest, not so much.
The people who did this work know their stuff. The owner has worked on or restored just about any kind of V-twin made. We were all scratching our heads with the conflicting information coming in. For the people who changed one in a parking lot; kudos! The gods were smiling.
I don't know or remember if the cam belt is mentioned in the manual. S&S, on one site, recommended checking every 10k miles and replacing every 30k.
I'm going to pop the cover off at every oil change from now on.
It's so much fun being a Beta Tester!
What's your mileage? Who cares. Is it practical? See #1. What happens when it rains? You get wet.
|
|
|
|
|
Joined: Apr 2013
Posts: 1,370 Likes: 11
Has a lot to Say!
|
|
Has a lot to Say!
Joined: Apr 2013
Posts: 1,370 Likes: 11 |
I am cribbing hopelessly from the S&S sheet here as well as adding my own observations.
This V-Twin is a non-interference engine. When the belt fails it will not destroy the pistons or valves. However, it may be a sign that a valve is stuck!
CamBelt Replacement:
1 - remove belt cover. If the belt has already self-destructed remove and clean everything!
2 - rotate engine until timing pin locations on all three cams line up with their corresponding holes in the intermediate cam cover. The FTDC mark will align with the notch in the pinion sprocket. This is a small arrow in the 7 o'clock position under the pinion sprocket. The front cylinder is the right one where Front Top Dead Center means something. We put the M3W into fifth gear when it was very close and slowly nudged it so that it was aligned perfectly then set the brake and wheel chocks.
3 - remove pinion bolt and washer using a TP45 tool. This is the end of the main crank at the bottom.
4 - insert the 3/16" diameter dowel pins into the cam sprocket timing holes. Tools help with the rockers still attached.
5 -- use an 11/16" box wrench to take the tension off the cam belt tensioner. Three hands help. Be creative, otherwise.
6 -- remove the two idler sprockets. Note the flange on each. The #2 cylinder (back) will be on the left with the flange on the engine side. The #1 cylinder (front) is on the right with the flange facing the front.
7 -- install the new belt following the diagram on the inside cam belt cover.
8 -- reinstall the idler sprockets. Remember their orientation. Torque to 15-18 ft-lbs.
9 -- remove the alignment pins. Do this BEFORE you release the belt tensioner. If you do it afterwards you will need vice grips to pull the pins out. Please don't ask how I know...
10 -- release the pressure on the belt tensioner.
11 -- oil and reinstall the pinion bolt and torque to 35 ft-lbs.
12 -- with the cover off and everyone's fingers out of the way fire up the engine and see if it works. If it does, great! You're almost done. If it doesn't, go back and check everything one step at a time.
13 -- replace the cover without the gasket but use 1.5-2.0 mm thick washers as spacers between the block and cover. I feel it's a kludge but heat is the culprit here. Don't drive in dust storms. Water should not be an issue.
After a nice test drive I pulled into the drive and shut everything down. I put my hand on the cam belt cover and while it was warm it was not as blistering hot as it used to be.
What's your mileage? Who cares. Is it practical? See #1. What happens when it rains? You get wet.
|
|
|
|
|
Joined: Mar 2014
Posts: 522 Likes: 1
Talk Morgan Regular
|
|
Talk Morgan Regular
Joined: Mar 2014
Posts: 522 Likes: 1 |
Excellent instructions. I have printed them out and put them with the car!
Whilst finding tappets, I have found a more reasonably priced belt stockist here in the uk.
|
|
|
|
|
Joined: Aug 2014
Posts: 342
Learner Plates Off!
|
|
Learner Plates Off!
Joined: Aug 2014
Posts: 342 |
Thanks Michael, top instructions for the Belt changing. Also have printed them 
Cheers,
Georges
M3W, Super Dry edition, sep. 2013 ...called 'DogNose'
|
|
|
|
|
Joined: Mar 2014
Posts: 522 Likes: 1
Talk Morgan Regular
|
|
Talk Morgan Regular
Joined: Mar 2014
Posts: 522 Likes: 1 |
|
|
|
|
|
Joined: Jan 2014
Posts: 1,075
Has a lot to Say!
|
|
Has a lot to Say!
Joined: Jan 2014
Posts: 1,075 |
Sorry guys for crapping out on you all after I suggested a spacer with air ports so to speak.
I've been stuck out here in Victorville CA for about a month and this week looks like the end of it. After I get back home and sort a few things out with the wife.... I'll be back with you guys.
If anyone would like to try a spacer, I can do some investigating and buy a gasket for my template. I can then do a reverse engineer drawing in AutoCAD of the gasket and the print out to 1:1 full scale and compare. If all is good, a 1/4" thick aluminum plate could be cut on our water jet and then slots put in on the side that would not allow direct water from rain or washing the car.
I hear many opinions and it was only a thought, but I'm open to other thoughts as well. If the 2 mm gap is what S&S recommends, that just about .079".
The Wedge motor for S&S is not a new product for them, but several years now in production. If heat is the true cause, I would feel that S&S would have already modified their cam chest cover with the appropriate air ports and screens, like the picture of the motorcycle someone posted back a few pages. This just seems like a poorly though out bandaid on their part.
Guys, I should be back next week to continue my ramblings. I have a couple PM's that I'll get back with then and see what the thoughts are about a spacer plate of some sort.
Thanks and have a great week!
Dan
|
|
|
|
|
Joined: Jul 2013
Posts: 3,732 Likes: 79
Talk Morgan Addict
|
|
Talk Morgan Addict
Joined: Jul 2013
Posts: 3,732 Likes: 79 |
FWIW - from the S&S X-Wedge Engine Owner's Manual:
Timing belt - Inspect every 10,000 miles (16,000 kilometers). Replace every 30,000 miles (48,000 kilometers).
Cam Belt Drive Inspection
To inspect belt-
1- Remove the belt cover.
2- Visibly inspect the belt for the following conditions:
a- If the following conditions are found replace the belt:
Internal or external cracks, tears, and chipped or missing teeth.
b- Frayed edge cords are acceptable, but the belt should be monitored for continued wear.
3- If belt is found to be acceptable install a new gasket and replace the belt cover
Noteote : Thin translucent debris inside the belt cavity is normal.
Red Leader 
|
|
|
|
|
Joined: Aug 2014
Posts: 342
Learner Plates Off!
|
|
Learner Plates Off!
Joined: Aug 2014
Posts: 342 |
Ok, did it, her's my mod for CamBelt cooling Drill holes around the S&S logo...  Made a second Grid Plate and M3 filets & screw to tighten it (just to be shure to avoid debrids in the Cam chamber) 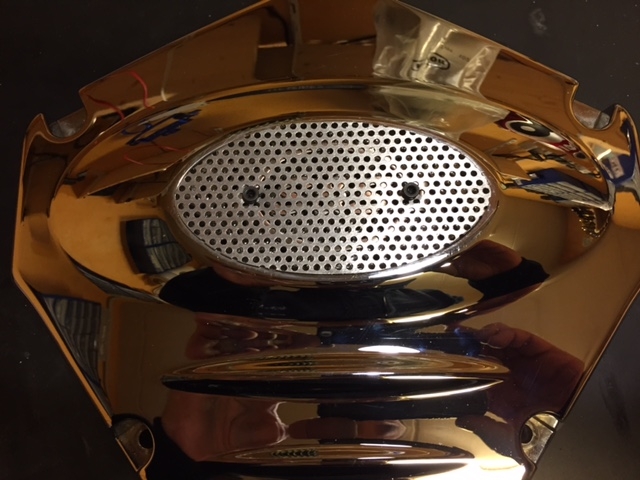 Efficienty seen throug light 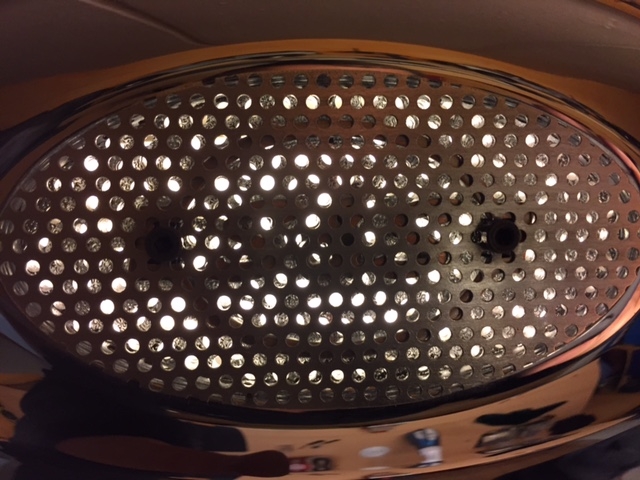 2mm gap between CamBelt housing and engine ...thats it  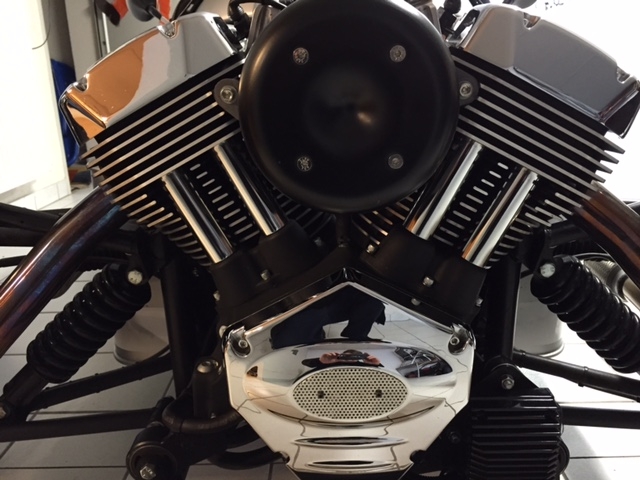
Cheers,
Georges
M3W, Super Dry edition, sep. 2013 ...called 'DogNose'
|
|
|
|
|
Joined: Jul 2013
Posts: 1,338
Has a lot to Say!
|
|
Has a lot to Say!
Joined: Jul 2013
Posts: 1,338 |
|
|
|
|
|
Joined: Jul 2013
Posts: 1,338
Has a lot to Say!
|
|
Has a lot to Say!
Joined: Jul 2013
Posts: 1,338 |
Pic #2 why didn't you do two openings on both sides just above the lower bolts,on the sides.instead of in the center of the cover then no need of worrying of road debry getting inside
|
|
|
|
|