|
Forums39
Topics49,843
Posts837,339
Members9,596
| |
Most Online1,063
Jun 14th, 2026
|
|
|
|
Joined: Dec 2008
Posts: 22,356 Likes: 353
Roadster Guru Member of the Inner Circle
|
OP

Roadster Guru Member of the Inner Circle
Joined: Dec 2008
Posts: 22,356 Likes: 353 |
Day 2 and side 2 - nearside. This time I was more optimistic, having learned a few tricks on day 1. This is how I did the wrapping with Denso tape.....  This is the difference between the nearside old and new springs.   I've added some neoprene sheet to act as a buffer in case the spring gets near the body. This is offside.  The rear nearside shackle was easier to sort, but those washers were a pain to get right.  The U bolts on this side took longer as I couldn't line up the spigot on the spring with the axle. Here it is, partly located with wooden blocks assisting.  Once the U bolts were properly tightened down - on to the G clamps.  The front fastener was much harder to locate than the offside which went straight in. This one needed some persuasion. Note the neoprene gasket over which fits the spring cover.  And that was it. Two days of hard graft, but worth it! On this side I fed the spring in from above and it was a bit easier to handle. I'll post some before and after dimensions once Bumble is back on the floor. And now for another snooze.
DaveW
'05 Red Roadster S1
'16 Yellow (Not the only) Narrow AR GDI Plus 4
|
|
|
|
|
Joined: Dec 2008
Posts: 22,356 Likes: 353
Roadster Guru Member of the Inner Circle
|
|
OP
Roadster Guru Member of the Inner Circle
Joined: Dec 2008
Posts: 22,356 Likes: 353 |
DaveW
'05 Red Roadster S1
'16 Yellow (Not the only) Narrow AR GDI Plus 4
|
|
|
|
|
Joined: Nov 2011
Posts: 7,342 Likes: 49
Talk Morgan Guru
|
|
Talk Morgan Guru
Joined: Nov 2011
Posts: 7,342 Likes: 49 |
Thank you DaveW for your efforts to re-post this item. Very useful 
A Morgan Identified Fastidious Owner...
2011 4/4 Bespoke, 1981 Delorean, Auburn Boat Tail
|
|
|
|
|
Joined: Dec 2011
Posts: 1,943
Talk Morgan Enthusiast
|
|
Talk Morgan Enthusiast
Joined: Dec 2011
Posts: 1,943 |
WELL! I certainly do not RR rear springs this way. BUT! I am changing in +8 Bitsa from 5 leaf to 6 leaf and I will try it Your way. I have done rear springs so many times that if I need to I can do it in a day (or maybe a little bit longer). At first glimmer I see some benefits and disadvantages. But until I try it Your way I am "Whistling Dixie". Thanks for Your efforts.
What is the advantage of Denso tape over Chain Oil? If You have not used Chain Oil don't bother answering this question.
Button
|
|
|
|
|
Joined: May 2011
Posts: 1,625 Likes: 25
Talk Morgan Enthusiast
|
|
Talk Morgan Enthusiast
Joined: May 2011
Posts: 1,625 Likes: 25 |
WELL! I certainly do not RR rear springs this way. BUT! I am changing in +8 Bitsa from 5 leaf to 6 leaf and I will try it Your way. I have done rear springs so many times that if I need to I can do it in a day (or maybe a little bit longer). At first glimmer I see some benefits and disadvantages. But until I try it Your way I am "Whistling Dixie". Thanks for Your efforts.
Button what is your method ? I have replaced the bushes in the end of the leaves previously when the body was off the car which made it easy. I now need to replace the springs, with the body on, Daves method of clamping will not work on my 1971 car as the battery tray is full width supported on the chassis rails so there is no room for clamps to be fitted. I was thinking of a long lever clamped or bolted over the front of the springs enabling me to push the spring down in order to fit the bolt through the chassis and spring.
2021 M3W
2013 M3W - Sold
1971 4/4 2 Seater
1934 Sports
|
|
|
|
|
Joined: Dec 2008
Posts: 22,356 Likes: 353
Roadster Guru Member of the Inner Circle
|
|
OP
Roadster Guru Member of the Inner Circle
Joined: Dec 2008
Posts: 22,356 Likes: 353 |
Button - when I did this job, my leaf spring experiences were all with MG, so I just got on with it, trying to be logical!
The two main obstacles were first, the washers between the rear shackles and chassis mounts, which just kept dropping through.
The second was that the second spring was very difficult to align with the rear axle spigot, and the front end was much harder to force into place than the first spring.
Roger, somewhere I've seen a photograph of a long lever which attaches to the front of the spring. It's something I might do "next time". A jack handle and some U bolts might just do it.
A second pair of hands would have made that so much easier, but I didn't have that luxury.
DaveW
'05 Red Roadster S1
'16 Yellow (Not the only) Narrow AR GDI Plus 4
|
|
|
|
|
Joined: May 2011
Posts: 1,625 Likes: 25
Talk Morgan Enthusiast
|
|
Talk Morgan Enthusiast
Joined: May 2011
Posts: 1,625 Likes: 25 |
Roger, somewhere I've seen a photograph of a long lever which attaches to the front of the spring. It's something I might do "next time". A jack handle and some U bolts might just do it.
I am sure I have seen them use a rudimentary lever at the factory on the rear of the spring having fitted the front end first. Easy with the body off though.
2021 M3W
2013 M3W - Sold
1971 4/4 2 Seater
1934 Sports
|
|
|
|
|
Joined: Dec 2011
Posts: 1,943
Talk Morgan Enthusiast
|
|
Talk Morgan Enthusiast
Joined: Dec 2011
Posts: 1,943 |
WELL! I certainly do not RR rear springs this way. BUT! I am changing in +8 Bitsa from 5 leaf to 6 leaf and I will try it Your way. I have done rear springs so many times that if I need to I can do it in a day (or maybe a little bit longer). At first glimmer I see some benefits and disadvantages. But until I try it Your way I am "Whistling Dixie". Thanks for Your efforts.
Button what is your method ? I have replaced the bushes in the end of the leaves previously when the body was off the car which made it easy. I now need to replace the springs, with the body on, Daves method of clamping will not work on my 1971 car as the battery tray is full width supported on the chassis rails so there is no room for clamps to be fitted. I was thinking of a long lever clamped or bolted over the front of the springs enabling me to push the spring down in order to fit the bolt through the chassis and spring. I take the fronts off first. Using big "C" Clamp. Jack up the axle and place stands under it. remove "U" bolts and plate. Remove back end at the shackle and pull spring out thru the cockpit. I have no interference with the battery tray as the +8 has its Battery on the scuttle and the same for the +4-4STR. DHC I have removed the forward end of the springs to R&R the rear axle. No problem with the Battery tray. Must be a different design than Yours.
Button
|
|
|
|
|
Joined: Dec 2011
Posts: 1,943
Talk Morgan Enthusiast
|
|
Talk Morgan Enthusiast
Joined: Dec 2011
Posts: 1,943 |
WELL! I certainly do not RR rear springs this way. BUT! I am changing in +8 Bitsa from 5 leaf to 6 leaf and I will try it Your way. I have done rear springs so many times that if I need to I can do it in a day (or maybe a little bit longer). At first glimmer I see some benefits and disadvantages. But until I try it Your way I am "Whistling Dixie". Thanks for Your efforts.
Button what is your method ? I have replaced the bushes in the end of the leaves previously when the body was off the car which made it easy. I now need to replace the springs, with the body on, Daves method of clamping will not work on my 1971 car as the battery tray is full width supported on the chassis rails so there is no room for clamps to be fitted. I was thinking of a long lever clamped or bolted over the front of the springs enabling me to push the spring down in order to fit the bolt through the chassis and spring. I take the fronts off first. Using big "C" Clamp. Jack up the axle and place stands under it. remove "U" bolts and plate. Remove back end at the shackle and pull spring out thru the cockpit. I have no interference with the battery tray as the +8 has its Battery on the scuttle and the same for the +4-4STR. DHC I have removed the forward end of the springs to R&R the rear axle. No problem with the Battery tray. Must be a different design than Yours. I have used two threaded 1/4" rods. Drilled holes just behind the cross member and with a flat bar on the top used this rig to compress the spring so I could take the bolts out. Might take a look at this and see if it would work.
Button
|
|
|
|
|
Joined: May 2012
Posts: 1,703 Likes: 35
Talk Morgan Enthusiast
|
|
Talk Morgan Enthusiast
Joined: May 2012
Posts: 1,703 Likes: 35 |
Roger, somewhere I've seen a photograph of a long lever which attaches to the front of the spring. It's something I might do "next time". A jack handle and some U bolts might just do it.
I am sure I have seen them use a rudimentary lever at the factory on the rear of the spring having fitted the front end first. Easy with the body off though. This is my sorry attempt at a lever. It was tacked together on the fly from bits out of my scrap box when I was wrestling with the front bolts. It has LH and RH ends. It enabled a 10 stone wimp to do the job single handed. 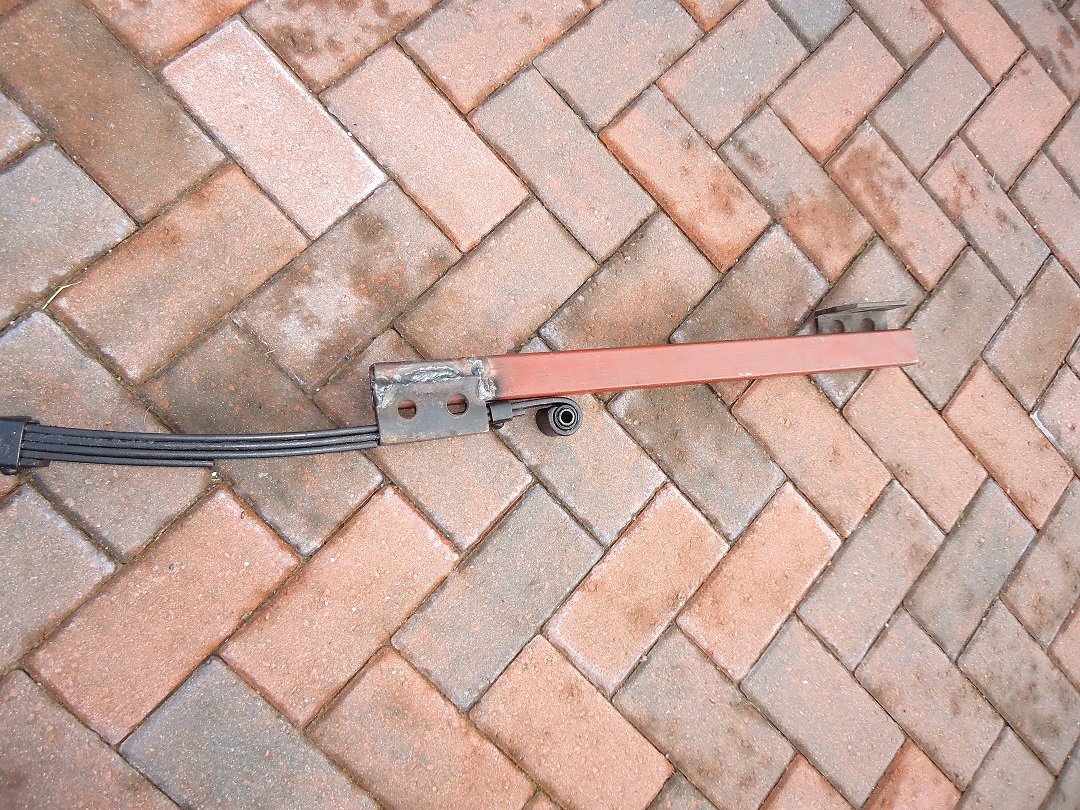
Roger
2011 Plus 4
|
|
|
|
|