|
Forums34
Topics48,341
Posts812,981
Members9,208
| |
Most Online1,046
Aug 24th, 2023
|
|
|
|
Joined: May 2019
Posts: 386 Likes: 17
Learner Plates Off!
|
OP

Learner Plates Off!
Joined: May 2019
Posts: 386 Likes: 17 |
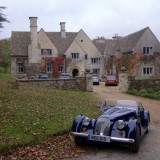
I'm preparing my 65 Plus 4 for a full paint job. I have gotten down to the small round parking lamps on the front and the rear. I've not been able to figure out how to remove these things. Having checked the forums, Google, GoMog and a handful of Morgan workshop manuals, I'm turning to the collected wisdom of this group for some assistance please..
Ed
Last edited by Edwin; 28/08/21 03:50 PM.
65 Plus 4 / 4 Seater, car addict
|
|
|
|
|
Joined: Sep 2014
Posts: 2,272 Likes: 7
Talk Morgan Expert
|
|
Talk Morgan Expert
Joined: Sep 2014
Posts: 2,272 Likes: 7 |
I hope that I have understood the correct issue that you are experiencing , if not I apologise.
The front parking lights on the wings you mean? These are removed from underneath the wing. The light is mounted on a threaded stem , this is fixed to the wing stay with a large nut . Remove the front wheels and have a go at removing the nuts . Beware as they are subjected to a lot of road dirt (and worse!) they can be very reluctant to release, I would use lots of penetrating fluid and if need a little heat to help. Once the nut is removed withdraw the light from the top complete with the two wires (but do remove the bullet connectors from the loom first.
The rear parking lights are inside the red plastic lens . To remove this, again it is best to work from under the wing with the wheel removed, but as these are further back in the wheel arch you may be able to work around the wheel. First undo all the electrical connections to the lights (parking and stop) , then tackle the small nuts that secure the light base to the wing (one above and one below (again these may well be very corroded and difficult , in which case you may well need to replace the light base with another good one. You can of course remove the red plastic lens cover first of you choose, but this will expose the bulbs and holders, it is up to you.
Andy G
1999 +8 , Indigo Blue.
Ex-John McKecknie/Mike Duncan 1955 +4 racer.
|
|
|
|
|
Joined: May 2019
Posts: 386 Likes: 17
Learner Plates Off!
|
|
OP
Learner Plates Off!
Joined: May 2019
Posts: 386 Likes: 17 |
![[Linked Image]](https://www.tm-img.com/images/2020/10/17/IMG_20190803_1857125.jpg) I'm asking about the small round red signals on either side of the spare above. Also the clear round front signals on either side of the badge bar below: ![[Linked Image]](https://www.tm-img.com/images/2020/10/17/IMG_20190616_1436076.jpg)
65 Plus 4 / 4 Seater, car addict
|
|
|
|
|
Joined: Nov 2018
Posts: 6,056 Likes: 160
Talk Morgan Sage
|
|
Talk Morgan Sage
Joined: Nov 2018
Posts: 6,056 Likes: 160 |
If they're the same as the fog lights on mine (next to the numberplate lights in the photo) - remove the chrome trim ring - work a small screwdriver between the ring and the rubber. You can rhen remove the glass, again get a small screwdriver to flick it out of the rubber. There are then three small screws which will have nuts of the rear. Undo these and the rubber holder/bulb mount should pull forward. As mentioned, need to disconnect the wiring from the loom. ![[Linked Image]](https://tm-img.com/images/2021/06/03/yKRdxaxsPWhRoNuo_AfQGOxhpuKWnsOpd8FckxfdOGzCUL7iZ_jtRKxlY_3EogmMSdP7bhR7KLUiplsmgOpuuCQtvb-WQj3dA1QsRIAfMwVPpAFy8fbk_o3tt3Mr8IH9sovpQlX5Tsz2CRDVHZAiGrHWE9FHnlkSimMLBrtNA0LjlF-SfWwJjsk3x-EsR5K8s4HMkbpH.md.jpg)
1972 4/4 4 seater, 1981 MGB GT
1984 Harley Davidson Electra Glide, 1990 Kawasaki ZX10
|
|
|
|
|
Joined: Mar 2013
Posts: 826 Likes: 6
Talk Morgan Regular
|
|
Talk Morgan Regular
Joined: Mar 2013
Posts: 826 Likes: 6 |
HI Edwin !....TBM has accurately described the procedure.  I suggest being extra careful when levering out the lens so as not to scratch it, also carefully avoid tearing or piercing the rubber retaining collar. To aid in the process you will find it very helpful to use some form of lubrication between the components. (ordinary dish-washing soap is all you need) Best of luck with the new paint job, looking forward to seeing some photos of it when complete! 
Bert & B1800
"Tis well enough to know how much to know; and when to know, not to know, too much."
|
|
|
|
|