This is how it looks refitted, and with some red tape over the screw heads. Compare with the second photograph from the top and you'll see the difference.

The two extra wires are wrapped in loom tape and go down the offside, linking with the existing loom in the rear corner and secured with cable ties. The idea is that the plug can be fished out from the hole between spare wheel and bodywork and connected to the extra lamp when needed. I'll do a picture of that in the final stages when hopefully it will be clearer.
Next step was the lamp bracket. I wanted stainless, but given how hard it is to work, I started with an offcut of approximately the right size. It's 0.7mm, so a bit thinner than I would like, but was a snip (Hah! a pun

) at 70p.

This was the initial shape, bent over various bits of wood. I bent the edges at about 30degrees in the vice to stiffen it up, and that worked quite well. I also drilled the two holes you can see with a fancy new drill bit, which was good considering how tricky stainless can be.

The idea is that the bracket simply clips onto the rack and is held by the luggage........ no extra holes in the Mog - remember?

The white is the plastic protective cover which I'll leave on until it's finished.

This is how it looks with the light unit added..........
Plus two more bends to get the light level.
Spot the neoprene edging.

Here's the underside. I've lined it with 3mm standard density neoprene, and left a slot for the wires. The neoprene will 'grip' the luggage cover and limit lateral movement. I'm hoping that there will be enough space for another thin layer of neoprene so that the wires are hidden completely.

Here's the rub though. Two of the LED's in this unit are faulty, so I can't finish & fit it. I have another unit on the way, so by next weekend I should be able to finish it off.
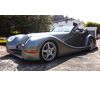
So for now, here's how the unfinished article looks in place.........


When the white plastic comes off, I think it should look OK.